|

Tuesday, September 26, 2006
No-Bake Cakes
 Ordinarily, gifts are wrapped in fancy paper or cloth and finished off with a colorful bow of ribbon. But Kaye Catral discovered a new way of presenting gifts on kid occasions like baby showers, baptisms, and birthdays. Ordinarily, gifts are wrapped in fancy paper or cloth and finished off with a colorful bow of ribbon. But Kaye Catral discovered a new way of presenting gifts on kid occasions like baby showers, baptisms, and birthdays.
"They're known as diaper cakes. They look like cakes, but are made out of non-edible stuff like bibs, blankets, diapers, and pacifiers," says the 31-year-old mom who owns and manages Nappy Cakes.
At P850 for single-tier, P1,000 for two-tier, and P1,500 for three-tier cakes, Catral's cute creations also contain a rattle, a teether, a receiving blanket, a burp cloth, a bib, feeding bottles, a brush, and a comb. Placed on top of a cake board and wrapped with tulle, they come with a recipe card and a personalized gift card. Clients can choose from cartoon themes such as Winnie the Pooh, Baby Mickey, Baby Minnie, Sponge Bob, Precious Moments, among others. Her other product lines-toddler, towel, and bridal cakes-cost a few hundred pesos more.
"Some people think they're expensive, but the same products go for about $70 in the States," says Catral. But she adjusts to her customers' budget so more people can enjoy her handiwork.
Catral herself saw her first diaper cake in an episode of the sit-com Sex in the City where the character Miranda received one during her baby shower. Inspired, Catral - who used to sell handmade hair accessories at bazaars - tried her hand at making diaper cakes, which she gave to friends as gifts.
"It actually took a few attempts before I was able to perfect them. I don't even know how I got my first customers. I simply started getting a few orders a month." And these non-edible cakes have become a huge hit. The first of their kind in the Philippines, they have always been the main attraction at parties.
Catral, who has two-year-old daughter and a marketing job, was content doing Nappy Cakes on the side, and was actually fending off a few partnership offers because that would require her to commit to the business.
What changed her mind was a trip to Seattle in May 2004, when an aunt, Edith Lopez, convinced her to start her diaper cake business. "She didn't want me to partner with anyone else, so she gave me P50,000 as initial capital," she says. "There was definitely a risk in starting the business, but my aunt didn't pressure me. If the business didn't work out, she said to think of the money as a gift."
Soon after her return to the Philippines, Catral set to work on her new venture, but without giving up her full-time job. This allowed her to use her aunt's money for buying her initial supplies - hairbrushes, ribbons, towels, bibs, and other baby stuff.
The professional relationships she developed in her marketing job helped her get various high-end products from distributors at a lower price. She insisted on getting only quality products because "as a mom, I know quality is important."
To price her products, Catral uses "tiangge-style" accounting where she simply adds all her expenses and tacks on a 20-percent mark-up.
News of Catral's fancy gifts spread by word-of-mouth, in e-groups, and through a few features in major newspapers and magazines. In early 2005, she had over 30 corporate clients, including Makro and PLDT, and enough individual clients to fill her two mobile phones' address book. She was getting an average of 10 orders a week, with a monthly profit of P30,000.
"It's still fairly easy for me. I spend about three hours a night finishing my orders. During this one rush job for Marvin Agustin, I made a two-tiered cake in 16 minutes!" Once in a while, Catral turns to her daughter's yaya for help. "She can make the one-tiered cakes pretty well, but the larger varieties just don't look the same."
Catral soon discovered a downside to being successful: Copycats. "That was when I decided to register my business with the Department of Trade and Industry. I actually had a hard time registering the name Nappy Cakes because they didn't understand that I wasn't selling cakes. They thought I was trying to deceive people!"
Until now, Catral has to explain her product to potential clients, which allowed her to put her marketing skills to good use. She uses different venues to promote and sell her products, as well as engages in exchange deals, participates in baby and kids shows twice a year, and forges tie-ups with event organizers. "There's also the need for constant innovation. Copycats and competitors are natural, so I just make sure that I maintain my standards and continue coming up with more products."
With an additional P50,000 from the same aunt, Catral came up with a new line called Baby Blooms - tiny towels rolled up into rose buds -and is looking forward to opening a stall this year so more people can see and appreciate how she could turn ordinary materials into something creative and fun.
SOURCE:
No-Bake Cakes
At Nappy Cakes, you can have your cake but you can't eat it, too - literally - because it's a company that makes creative, albeit non-edible gifts for baby showers, baptisms, and birthdays.
By Katrina Tan
Entrepreneur PH
Tags:
Small & Medium Business
Read more
Posted on 12:24 AM | 1 Comments | Email Story To Friends | Subscribe Via Email
Thursday, September 21, 2006
How to Make Sausage Casings
 The usual materials for sausage casing is the intestine of the slaughtered hog, sheep or cow. The intestine are lined up with five layers from within, such as: The usual materials for sausage casing is the intestine of the slaughtered hog, sheep or cow. The intestine are lined up with five layers from within, such as:
1. Mucosa or lining of mucosa or saliva composed of cells that aid in digestion, absorption and circulation of substances to the various parts of the body.
2. Submucosa -- nerves and fibers with fatty tissues in them. These are rich in collagen, the chief material in casing.
3. Smooth muscles that surround the intestine.
4. Layer of fibers.
5. Serosa (outermost layer), composed of thin elastic fibers.
Cow serosa is thicker than hog serosa.
Procedure:
Carefully pull the intestines from the slaughtered animal.
Fat removal:
Carefully scrape the fat with a knife. Remove all fat as much as possible because this will cause rancidity in the casings. This fat can be used for cooking. When pulling the intestines from the slaughtered pig or sheep, remove as well the adhering hairs, from the intestines. If it will facilitate, the intestines can be cut in pieces according to need.
Removal of other materials:
This can be done manually carefully or by means of a water hose for cleaning as well.
Removal of slimy substance:
The removal of slime depends on the kind and size of the intestine. It may be cleansed by passing the intestine under a roller, or by scraping it to remove the serosa. Bigger intestines are flushed with water or turned inside out. After cleaning, soak the casing overnight in strong salt solution.
Grading and Storing:
The grading of casings is according to class, size and quality. The higher quality (or export quality in the U.S.) is that which is free from defects like holes, bruises or warts. After grading this is pumped with air or with water to enable the measuring of the circumference. Hog and sheep casings are marketed in lengths of 90 meters more or less, and those of cows by 30 meters. After grading, these are salted with fine salt and stored further, and drained if wet.
After draining, it is further shaken to remove any remaining water and salted again if necessary.
Storage:
Casings packed in salt get deteriorated too. These have to be put in 4°C temperature, but freezing must be avoided, as it could cause cracks that will be the start for the growth of molds. Avoid also the growth of red molds that thrive on salt. This will cause the decay of the casings.
Other Casings:
1. Cow bladder -- after cleaning, air dry them. When dry, they are ready for marketing.
2. Hog or sheep intestine parts -- these are joined together into various shapes. To make the edges adhere together, these are passed through heat and then joined together.
3. When cool and dry, they are packed and are ready for marketing.
Source: Edible Meat By-Products by Pearson and Dutson, Sorsogon LGU
Tags:
Food Products
Read more
Posted on 4:36 PM | 0 Comments | Email Story To Friends | Subscribe Via Email
Preserving Sardines in Can
 Materials: Materials:
100 grams size bangus
½ teaspoon salt
2 tbsp. cooking oil
½ tsp. vetsin
4 tbsp. tomato sauce
2 slices bell pepper
Procedure:
1. Remove the fish scales, gills and internal organs, fins, tail, and the black lining in the belly.
2. Wash very well and drain.
3. Slice according to the size of the can, and arrange the pieces inside the can.
4. Steam the can for 20 minutes to remove the moisture in the fish.
5. Remove all moisture from the can, put in the tomato sauce and all other ingredients.
6. Seal the can and heat at 115.6°C for one and a half hours.
7. To avoid overcooking, put the can immediately in running water after cooking.
8. Wipe clean the cooled can. The viscerals removed from the fish can be used as fish concentrate when dried and powdered, and for fish curls.
Source: PCARRD Farmnews January 1984
Tags:
Food Products
Read more
Posted on 4:22 PM | 0 Comments | Email Story To Friends | Subscribe Via Email
Christmas Decorations
 Pine cone Christmas tree decoration Pine cone Christmas tree decoration
Materials needed:
Dry pine cones
Green, gold and red glitter
Glue
Card
Ribbon
Paint the pine cone with glue and sprinkle the green glitter over it and leave to dry.
Make a little star from the card and cover it with the yellow glitter. Once the glitter has dried on the tree make some wavey lines with the glue and sprinkle the red glitter (so it looks like tinsel on a tree) shake off the excess. Tie the ribbon in a circle and glue to the pine cone and hang from the Christmas tree.
Bead garland
Materials needed:
An assortment of plastic beads
String
Scissors
Cut the string according to the length desired for the garland.
String on the first bead and tie a knot to stop it falling off. Now continue putting the beads on the string until there is just a bit left. Tie a knot at the end of the string. Now you are ready to hang your bead garland from the tree.
Christmas tree card holder
Materials needed:
Large piece of card
Scissors
Craft knife
Paint
Glitter
Glue
Ribbon
Hole punch
Draw a large christmas tree on to the card and cut it out. Paint the tree and leave to dry. Once dry draw your decorations then paint them and leave to dry. Apply glue as if it was tinsel dangled across the tree then cover with the glitter and shake off the excess. Now that you have completed your tree, decorations, tinsel and all punch a hole in the top and thread the ribbon through.
With help from an adult cut roughly 20+ slits all the way down the tree. Now you can hang your Christmas tree card holder from the door or wall and show off all your cards.
Paper chains
Materials needed:
Lots of paper in a variety of different colours
Scissors
Sticky tape
String
Cut the paper into strips of roughly 40cm x 10cm. Take one of the strips and tape it together so it forms a loop. Thread the next strip through the first one tape together and continue. You will see it begin to look like a chain. Continue this until it is long enough to stretch from corner to corner across the ceiling. Make another one for opposite corners. Tape a piece of string in a loop to each end of the chains. Now get an adult to hang it from the ceiling.
SOURCE: e-nterests.com
Tags:
Small & Medium Business
Read more
Posted on 4:04 PM | 0 Comments | Email Story To Friends | Subscribe Via Email
Wednesday, September 20, 2006
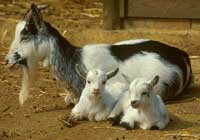
Goat Raising
 Goats can be reared in the pastureland, but rearing them in cages has more advantages such as: Goats can be reared in the pastureland, but rearing them in cages has more advantages such as:
1. Cage-reared goats are less exposed to parasites.
2. They are better fed, and so the mother goat gives more milk.
3. Less field space is necessary for growing fodder and grass. For every six (6) females and one male goat, one-fourth (1/4) hectare of land would be enough.
4. The caged goats are easier tended and controlled.
However, more capital is necessary, and needs a worker to gather fodder to feed the goats and clean the cages.
As preparation for the pasteur, plant such grasses and plants that the goats will need, like paragrass,napier,madre de cacao (kakawate), alibangbang and ipil-ipil. Apply as fertilizer for these plants the dried goat manure so as to make them flourish.
Cage
1. Wooden house, bamboo floor, with roof and open sides.
2. The floor is about 1.5 meters high from the ground so as to facilitate cleaning the manure.
3. At the sides of the house, provide food and drinking water.
4. Provide space outside to allow roaming around.
5. The nursing mothers and the weaning kids should have a separate house. One side must have a divider to separate the small ones from the mother at night.
6. Six (6) male goats are housed together.
Food
1. The aforementioned plants are feed for goats.
2. Do not give too much for each meal, of fresh forage.
3. Goats do not like dirty grass or acidic (spoiled) food.
4. They like variety of grasses for each meal.
Breeding
1. When the goats are about 6-8 months old, select good breeder and milker females and aggressive males.
2. A female goat may be mated at age 10-12 months. A male goat is ready to mate at age12 months. At the start, let him mate only a few, but as it grows older, the male goat can mate as many as 25 at age one and a half years.
3. A female goats fertile period lasts 2-3 days. The signs are:
a. it begins to bleat (me-e-eh) and wags its tail.
b. it urinates often.
c. the genital is inflamed and secretes mucous
d. the goat rides on other goats.
4. Mating should be once in the morning and once in the afternoon, and repeat next morning to be sure that there was fertilization.
5. Then separate the mated females. These will be pregnant in three (3) weeks if they would not manifest flirting.
Parturition (Delivery)
1. The goats gestation period is 145-155 days. Thus, the day of mating should be recorded.
2. When the time of delivery is near, the mother goat bleats (cries me-e-eh), discharges mucous from the genital, is cranky and scratches her bed.
3. At delivery, her mucous discharge is yellowish.
4. When the kid is coming out of its mother, help the delivery by pulling out the kid, but make sure that the hands of the helper are clean. Apply alcohol on the hands to avoid infection. Normally, the head comes out first. The kids are often two, rarely three.
5. Wipe the nose of the newly born kid to enable it to breathe freely.
6. Apply iodine at the end of the umbilical cord, and put a knot or tie it.
7. When the kids are four (4) days old, remove the newly growing horns to keep them from hurting one another. Only a veterinarian or one with experience should undertake this.
8. Others are: putting of mark on the ear one week after birth; cut off the nails once a month, and castration from one to four months old.
Milking
1. Milk the mother goat five (5) days after delivery. Continue milking up to 3-5 months until the kids are weaned, or 60 days before another delivery.
2. Milk the goat in the early morning before the kids suck.
3. If the mother goat has abundant milk, she can be milked again toward afternoon.
4. Give the mother goat 200 to 300 gm concentrate daily to increase her milk.
Weaning
If the goat is raised to milk, do not totally wean the kid from the mother when this is 3-5 days old. Separate the kid from the mother at night. If milk production is only secondary, separate the kid totally when this is 3 months old. Make sure the kids are fed and given water while they are separated from the mother. In this way, the kids will quickly learn to eat and drink even while still young.
Care
1. Allow the goats to exercise themselves 3-4 hours outside their cage.
2. Give them regular vaccination against disease.
3. Separate the sick and call for a veterinarian.
The common sicknesses of the goat are pneumonia and parasites.
Pneumonia:
Usually affects the goat with the onset and toward the end of the rainy season. Do not allow them to be exposed to rain or draft. Signs of pneumonia are difficult and fast breathing. Give the goat liquamycin, Tylan 200 or Combiotic injection.
Parasites:
Give the goat tetrazole or thixbenzole every six months.
Source: Greenfields Jan & Feb 1990 & PCARRD Farmers Dec 198
Bathe the Goat
A goat raiser from Miag-ao, Iloilo, made a study on the effect of giving a bath to his goats. Giving the same food, one group was given a bath once a week, and the other not. It was observed that the goats given a weekly bath grew and gained weight faster than those not given a bath. They were weighed every two weeks. The goats were slaughtered after three months. It was also seen that the meat of those given baths were more acceptable in taste and color and had less odor than those not given baths.
Manner of bathing the goats
1. Pour about two (2) liters water on each goat.
2. Then follow with a liter of water with a tablespoon soap. Let this stay on the goats body for about 3 minutes.
3. Rinse with about seven liters water.
4. Let them get dry before bringing them back to the cage.
Source: Greenfields Jan 1989
Tags:
Agri-Poultry Business
Read more
Posted on 5:12 PM | 0 Comments | Email Story To Friends | Subscribe Via Email
Tuesday, September 19, 2006
Coco Nectar Vinegar
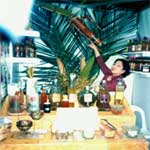
 Linda Corsiga, proprietor of the Sorsogon Food Enterprise (SFE) shows off their products during the Orgullo kan Bikol trade fair held at SM Mega Mall in Mandaluyong City, Metro Manila. She remembered an Australian friend told her that Bicol is a paradise for bees because it is coconut-rich. Linda Corsiga, proprietor of the Sorsogon Food Enterprise (SFE) shows off their products during the Orgullo kan Bikol trade fair held at SM Mega Mall in Mandaluyong City, Metro Manila. She remembered an Australian friend told her that Bicol is a paradise for bees because it is coconut-rich.
One of the crowd drawers during the recent Orgullo kan Bikol trade fair held at the SM Megamall in Mandaluyong City, Metro Manila was the booth of the Sorsogon Food Enterprise or SFE. The booth itself made from indigenous materials was artistically designed and has a touch of class. But the main attraction were the products themselves - Lola Conching Organic Coco Nectar Specialty Vinegar which are unlike the ordinary vinegar that now proliferates the market.
According to Linda R. Corsiga, the owner and Manager of SFE, their vinegar products have both nutritional and medicinal value and the natural herbs that are mixed with them are health promoting “neutraceuticals” (nutrient supplements that act like pharmaceuticals) and are considered “functional foods” or foods that are nutritious and at the same time can prevent diseases.
The coco nectar specialty vinegar comes in two forms as: a) filtered and pasteurized labeled as “classic” and b) unfiltered and unpasteurized, with the “mother vinegar” or film like gels floating inside the bottle termed or labeled as “virgin”. The vinegar has also four variants based on its four natural flavors namely: the raw wild honey; chili and ginger; garlic and lemon grass. These natural herbs as we know have nutritional value and are health-promoting. These specialty vinegar carry the brand name Lola Conching, after the name of the family matriarch who started the production of organic coco nectar vinegar as a backyard industry in the 50’s in Bulan, Sorsogon. But it was only sometime in 2003 when one of Aling Conching’s daughter, Linda decided to venture into vinegar production as a small family enterprise under name the Sorsogon Food Enterprises. This enterprise was conceived not only with the end view of gaining profit. It committed itself to the cause of lessening people’s exposure to chemically-treated food and to help protect the environment by propagating organic agri/aqua culture and espousing organic practices and natural methods in food production.
With the growing public awareness on the hazards of chemically –treated foods, consumers are looking for alternatives- the natural or organically produced foods. It is no wonder SFE products are much in demand. Among SFE’s market outlets in Metro Manila are: Rustans’ Supermarket, Waltermart, Gateway, Shopwise and other Organic shops in various parts of Metro Manila and neighboring provinces including the island of Boracay. Lola Conching’s vinegar has even reached as far Minnesota, USA. But ironically, in Bicol where these vinegars are being produced , only one small store in Bulan, Sorsogon serves as the market outlet for these products. Lola Conching’s vinegar is not yet known among most Bicolanos. That is why, SFE’s participation in “Orgullo kan Bicol” regional trade fair is one avenue for promoting their products, not only to Bicolanos but to all health conscious consumers.
Linda herself hopes that eventually their products would find more market outlets in the region because Bicolanos deserve no less. She says that her specialty vinegar are truly “orgullo kan Bikol” or pride of Bikol.
Linda who has a diploma in education used to teach in high school but a better job opportunity and a brighter financial prospect in the private sector beckoned, so she decided to pursue a new career path. For 13 years she worked at the International Finance Corporation of the World Bank as accountant and administrative officer. But through the years of living a comfortable life in Metro Manila with her husband and children, she keeps on returning to her roots in Bulan, Sorsogon where her family has some 10 hectares of coconut plantation.
When she resigned from the WB she decided to go into business. She remembered an Australian friend had told her that Bicol is a paradise for bees because it is coconut- rich. Coco flower is a major source of nectar which honey bees love. She then trained at UPLB on bee culture and soon after started with 45 bee-colonies. But this business venture did not progress because most of the bees died. She attributes this to the fact that she was not personally around to oversee the culture of the bees which she entrusted to her laborers.
But this did not dampen her enthusiasm. She then decided to pursue the vinegar production which her mother had started way back. Having learned her lessons from her experience in bee culture she set out to pursue this new business “hands-on” and with all the necessary preparations. First, she made an intensive research and study about vinegar production, trained and consulted with the Department of Science and Technology and the Philippine Coconut Authority. The Sorsogon Food Enterprise thus, was established in 2003.
Today, SFE has 12 people in its employ at its plant in Sorsogon. Four of them are the tuba or nectar gatherer who are now considered vanishing breed. The others are the bottlers, the labellers, the packers and the bottle cleaners. Every two months a truckload consisting of 10,000 bottles of vinegar is transported to Metro Manila.
The coco vinegar is produced by cutting off and shaving twice daily the top of the newly formed coco flower until the sap starts to drip out. These sweet ‘drippings’ are the same nectar that honey bees sip and turn them into honey in their hives. A bamboo collection vessel is placed where the sap will drip into, and a tuba harvester or “mangete” collects it once or twice daily. Natural fermentation takes a minimum of 60 days after which, the naturally sweet tuba (coconut toddy) has aged and has turned into the naturally best-tasting vinegar, without adulteration. When it reaches its natural acidity level, it is then bottled, without preservatives or chemical additives, free of artificial flavorings, colorings and dyes and sealed fresh to preserve all its natural goodness.
The SFE vinegar has been tested by two reputable BFAD-recognized laboratories which confirmed its purity and excellent quality as indicated by its Percent Titratable Acidity (PTA) and Permanganate Oxidation Number (PON). It was also tested for its vitamin and mineral content. Tests reveal the presence of beta-carotene, potassium, calcium, phosphorous, iron, magnesium and sodium. It has potent supply of potassium, which promotes cell, tissue and organism growth. The DOST has also certified that SFE vinegar has a minimum shelf life of one year.
Lola Conching vinegar are available in two glass bottle sizes, the 750 ml priced at P75 and the 350 ml priced at P45 which is a little bit expensive than the ordinary commercial vinegar available in most local market. But the price difference is insignificant considering the nutritional, health, and medicinal value one can derive from these organically produced coco nectar vinegar. It is ideal for cooking, dipping, marinating, salad dressing and pickling. If not diluted with water, it is itself a preservative.
But other than its culinary uses organic vinegar is touted to be “the Home Remedy for the 21st century”, according to Cal Oley, for the following reasons: it is high in cancer–fighting oxidants; a natural appetite suppressant; reduces cholesterol to prevent heart disease; helps retard osteoporosis; slows the effect of aging; reduces the frequency of headaches; helps cure many common ailments, from dandruff and menstrual cramps to acne and sinus and congestion. It is also a good bleaching agent.
It is about time we substitute our ordinary table vinegar most of which are often laced with acetic acid and or other chemical additives with this organic coco nectar vinegar.
"Other than its culinary uses, organic vinegar is touted to be ‘Home Remedy for the 21st Century’ for it is high in cancer-fighting oxidants, is also a natural appetite suppressant, it reduces cholesterol, helps retard osteoporosis, slow effect of aging, reduces frequency of headaches, and helps cure many ailments from dandruff and menstrual crumps to acne, sinus and congestion."
Go Natural: Shift to organic
Coco Nectar Vinegar
By Emily B. Bordado
_____________
Source:
UMAsenso
Official publication of the Department of Agriculture RFU 5
Vol. 14 No. 4
October-December 2005
Tags:
Small & Medium Business
Read more
Posted on 5:41 PM | 0 Comments | Email Story To Friends | Subscribe Via Email
Monday, September 18, 2006
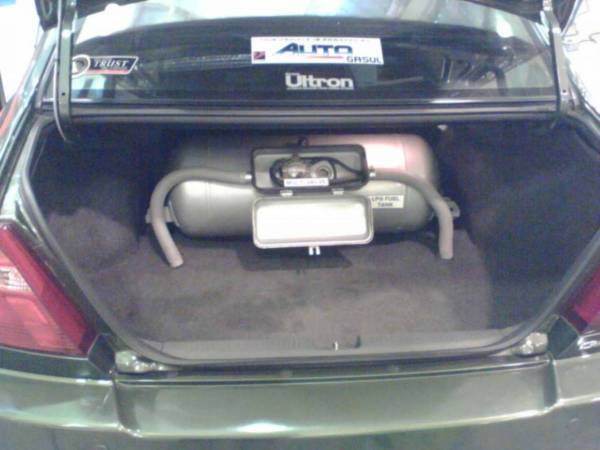
LPG Powered Cars and Taxi Cabs
 With fuel prices at an all-time high, more people are looking for ways to cut transportation cost with the least effect on mobility and convenience. Auto manufacturers are continuously developing engines powered by electricity and natural gas. However, it may take more than 10 years before these technologies can be perfected and priced reasonably for consumers to start buying them. With fuel prices at an all-time high, more people are looking for ways to cut transportation cost with the least effect on mobility and convenience. Auto manufacturers are continuously developing engines powered by electricity and natural gas. However, it may take more than 10 years before these technologies can be perfected and priced reasonably for consumers to start buying them.
In an effort to help car owners solve the problem of high fuel costs, Petron Corporation recently introduced, or re-introduced rather, the use of Liquefied Petroleum Gas (LPG) on gasoline-powered vehicles. This technology, which is popular in several industrialized countries like Italy, Japan, South Korea and the US, has been in use for more than four decades. Worldwide, there are close to 10 million motorists already using LPG to power their vehicles.
In the Philippines, the use of LPG became popular when hundreds of Korean-made taxis swamped the metropolis during the early 90’s. However, the technology did not flourish mainly because the infrastructure for refueling and servicing of LPG powered vehicles were limited and none of the big three oil companies gave it support. Fuel prices back then was so cheap that oil companies saw LPG as a competition — and not giving it support only meant that it will die a natural death — and it did.
Now, however, Petron has taken the lead in developing and re-introducing this fuel-saving technology that will not only benefit the car owners, but the environment as well. With the launch of Petron Xtend autogas, vehicle owners now have a sensible choice of using an alternative fuel that is cheaper and a lot cleaner.
Although LPG-powered engines consume five to seven percent more fuel per liter compared to gasoline, the difference is compensated by the big price difference between the two fuels. The current price of LPG (P25/liter) is at least 30 percent cheaper than the cheapest gasoline (P36.71/liter).
In a recent study made by Petron, they found that motorists, with a car powered by a 1600cc engine, who travel an average of 50 kilometers a day can save P50 daily, or P1 per kilometer traveled. In effect, the savings would relate to P350 per week or P18,200 a year.
Petron engineers explained that motorists who use LPG will also earn savings from reduced maintenance cost of their vehicles. According to Wilfredo Toledo, Petron’s Technical Department manager, using LPG will result in longer maintenance intervals such as oil changes and tune-ups as LPG has less contaminants, has only minute traces of sulfur, has low carbon content and no lead, leaving engine parts much cleaner and with less wear.
According to Toledo, Petron Xtend autogas has been proven to be environment-friendlier compared to gasoline. For comparison, Toledo revealed that for every kilometer traveled, a gasoline-fed car emits 0.001 gram of particulates, 0.14 gram of hydrocarbons and nitrogen oxide, 190 grams of carbon dioxide and 0.6 gram of carbon monoxide.
Xtend autogas, on the other hand, results in less than 0.001 gram of particulates, 0.09 gram of hydrocarbons and nitrogen oxide, 170 grams of carbon dioxide and 0.3 gram of carbon monoxide.
Toledo explained that LPG is a mixture of hydrocarbons composed mainly of 60 to 70 percent propane and 30 to 40 percent butane. When it is pressurized it becomes a liquid and it is in this form that it is pumped into the vehicle’s fuel tank.
Compared to gasoline, Xtend autogas has a higher content resulting in cleaner burning characteristics. For comparison, super grade gasoline only has a 98 octane rating, unleaded has 93 to 95 while LPG has an octane rating of 104. Once released into the engine, it will naturally become pure gas, resulting in a more efficient combustion.
Having driven a brand new car powered by LPG for a test drive, we felt only a slight change in engine performance (about five to 10 percent less). However, Toledo was quick to say that the engine can easily be tuned to increase the power. But even with the slight loss of power, the car still drove well, no smoke came out from the tail pipe, the carbon exhaust smell was nowhere and the engine noticeably run much quieter.
But with all these favorable points, there lies one drawback. The price of having an LPG system installed is a bit high, P26,000 to be exact. However, Petron engineers were quick to say that the initial investment, which is the same as the cost of a brand new cell phone, can be recouped in a matter or months.
Commenting on its safety, Toledo said "10 million people cannot be wrong. LPG has a safety record as good if not better than gasoline."
Toledo added that the LPG tanks and conversion kits they install are made of the highest quality steel and have been tested to withstand high-pressure. They are very durable and do not easily puncture like gasoline and other fuel tanks. For added safety, Toledo advised that motorists have the conversion kits installed at authorized Petron Xtend autogas stations.
At present, the Xtend autogas refilling stations can be found at Valle Verde 1 along C-5 Road in Pasig and on Gil Puyat Avenue corner Makati Avenue in Makati. More Xtend autogas dispensing stations will be put up within the year all across Metro Manila and in key cities and provinces all over the Philippines.
Petron Xtend autogas: LPG for gas-powered engine re-introduced
By ANJO PEREZ
----------
Cook with it, drive with it � and enjoy a cleaner ride.
The same liquefied petroleum gas (LPG) used for cooking food is now being used to fuel taxicabs that ply the busy streets of Metro Manila.
Xavierville Transport Service (XTS) has a fleet of 50 cabs operating all over Metro Manila and it is one of the few taxi companies now using LPG as an alternative fuel source.
At a time when diesel and gasoline prices are going through the roof, it is also worth noting that these vehicles for hire use fuel that costs less.
The STAR learned of this after chancing upon a Xavierville cab in Makati City.
The driver said in an apologetic tone that they do not allow passengers to smoke while in the cab because they have an LPG tank on board which is powering the cab�s engine.
Posted conspicuously inside the cab was a sign that read: "LPG-powered vehicle. Please do not smoke."
XTS operations manager Allan Redondo said in an interview that his company was among the first to use LPG as fuel for their fleet for a number of reasons.
Redondo said he has heard that taxi units belonging to cab companies EMP, Freedom and Monique have also scrapped the use of conventional diesel or gasoline in favor of the cheaper and cleaner LPG.
"Our cabs are equipped with conversion gears which vaporize liquid fuel from LPG containers for fuel," he said.
XTS, he said, started installing the conversion kits manufactured and distributed by the Torkita company in August last year and completed the installation of the gadget in all their vehicles in December 2005.
Manila�s cab companies are following a trend in using LPG fuel that began in Japan and in Bangkok, Thailand, where roughly 60 percent of taxicabs were fueled by LPG as of mid-2005.
LPG, Redondo said, is bought from Petron, which is working in partnership with Torkita.
XTS, based in Para�aque City, invested more than P1.3 million in the LPG conversion of its units and expects to recover the amount in two years.
Redondo said the company had to spend P26,000 for the conversion of each taxi unit and had to take out a bank loan to finance the project.
"It�s a long-term investment but it�s worth it," he said citing three main reasons and several advantages brought about by the use of LPG.
"Basically, there are three reasons why we invested in this. First, it�s for our drivers," Redondo said explaining how the use of LPG allows their employees to earn more.
XTS drivers, he said, earn by first meeting the boundary requirement while shouldering high fuel costs because the cost of fuel is not charged to the company�s share of the day�s proceeds.
Redondo said LPG costs only P26 per liter which means that drivers save more than P10 per liter, based on the current prices of unleaded and premium gasoline.
"Obviously, they earn more and are motivated to work more," he said, stressing that their company tries to consider how they can make their drivers happier.
Secondly, he said, using LPG as fuel, "in our own little way, is our contribution to the implementation of the Clean Air Act."
Redondo said the smoke emission rate of their taxis is now at negative levels, which means that their engines are burning "cleaner" fuel, thus reducing harmful smoke emissions.
He also said that using LPG as fuel is XTS� contribution to the national government�s call for the use of alternative and cheaper fuel sources.
Other alternative fuels promoted by the government are coco-biodiesel, derived from coconuts, and ethanol, which is derived from either sugarcane or corn. Both alternative fuels also burn clean, with minimal smoke emissions.
Redondo said shifting to LPG from ordinary diesel and gasoline also prolongs engine life and extends the time between tune-ups and oil changes � which makes for even more savings in terms of vehicle maintenance.
Besides being cost-efficient, the LPG conversion system installed in every Xavierville taxi unit is also very safe.
Laughing, Redondo said the warning against smoking because the vehicle runs on LPG is actually a bluff, taking advantage of the public�s fear of exploding gas tanks.
"It�s just a precaution, but it�s actually a misconception that an LPG will explode because of cigarette smoking," he said.
He confessed that the public�s fear of LPGs was being used to give their taxi drivers a valid reason to ask their passengers to refrain from smoking.
"There are a lot of safety precautions. There are check valves and the like that actually shut down the entire system in the event of any leak no matter how small," Redondo said.
However, public ordinances have been passed in some cities and towns in Metro Manila banning passengers and drivers of public conveyances like taxis from smoking while in these vehicles.
Metro taxis now running on LPG
By Michael Punongbayan
The Philippine Star 02/04/2006
----------
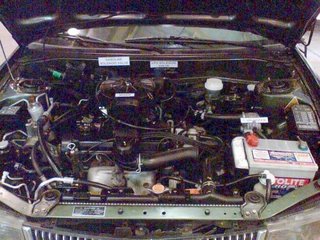
LPG Converted Mitsu Lancer

----------
Want to convert your car? Here are the contact details of NAIADDS:
NAIADSS
2604 Orient Square Bldg, Don Francisco Ortigas Jr. Rd
Ortigas Center, Pasig City.
tel: 687-7970 687-1659 6879151
fax: 687-9207
email: naiadss@pldtdsl.net
(They can install the LPG system at your home or office.)
Inquiry on refilling Stations?
Petron
tel: 671-9817
fax: 671-2689
email: gasul@petron.com
website: www.petron.com
SOURCES: Manila Bulletin, Philippine Star, Yehey! Tsikot Forums; Photos from ghosthunter of tsikot Forum.
Tags:
Entrepreneur Essentials, Small & Medium Business
Read more
Posted on 2:17 PM | 1 Comments | Email Story To Friends | Subscribe Via Email
PayPal Service For Pinoys
 Do you need to send PayPal funds but do not and cannot have a PayPal account since PayPal is not available in the Philippines? Pinoy Money Talk's (PMT) Verified PayPal account might be the solution you are looking for. Do you need to send PayPal funds but do not and cannot have a PayPal account since PayPal is not available in the Philippines? Pinoy Money Talk's (PMT) Verified PayPal account might be the solution you are looking for.
1. How can I use PMT's Pinoy PayPal Service to send funds?
There are three ways to send PayPal:
- Via Recipient's Site - Check if your recipient provides a site where PayPal payments are processed. Then in your PMT PayPal Transaction Request Form, include a detailed explanation of how to make the payment (e.g., what the recipient's payment URL is, what link/s should be clicked, information that need to be filled-up, etc.). Type International is an example of this transaction.
- Via Account in Site - If you need to be logged in to a site to make the payment, you will need to give PMT access to that account. For security purposes, change your password prior to giving your login information then change it back once the transaction is done. PMT will do no other activity in your account except to send the payment. Payments in eBay are an example of this type.
- Direct Payment - You can also send payment by simply supplying PMT the PayPal email address of the recipient. Explain the transaction when you request PMT to send PayPal funds.
2. What fees do I pay if I send PayPal using this service?
- 2% of the amount (minimum of $2) per transaction. For example, if you need to send $200, your total payment will be $200 plus the $4 fee (2% of $200), or $204 total. If you need to pay $50, the fee is still $2 (minimum fee) so you will need to pay a total of $52. Fees are charged on a per transaction basis.
3. How do I pay for the service?
- You can pay a deposit to PMT's UnionBank account. Account details will be provided once your request is approved.
4. I've filled up the Transaction Request Form, what do I do?
- Please wait for PMT to contact you within 24 hours using the email address you provided in the request form.
5. I have some more questions and clarifications.
- Please visit the Pinoy PayPal Service board in the PMT Forum.
For more informations about this service, please visit Pinoy Money Talk at http://www.pinoymoneytalk.com/pmt-paypal-service/
You could also sign up for the PayPal for the Philippines movement by clicking the banner below:

Tags:
Funding & Finance
Read more
Posted on 1:44 PM | 1 Comments | Email Story To Friends | Subscribe Via Email
Halloween Treats Recipes
 Halloween is an observance celebrated on the night of October 31, most notably by children dressing in costumes and going door-to-door collecting candy. It is celebrated in much of the Western world, though most common in the United States, Puerto Rico, Republic of Ireland, the United Kingdom, Canada, and with increasing popularity in Australia and New Zealand. Halloween originated in Ireland as the pagan Celtic harvest festival, Samhain. Irish, Scots and other immigrants brought older versions of the tradition to North America in the 19th century. Most other Western countries have embraced Halloween as a part of American pop culture in the late 20th century. - Wikipedia Halloween is an observance celebrated on the night of October 31, most notably by children dressing in costumes and going door-to-door collecting candy. It is celebrated in much of the Western world, though most common in the United States, Puerto Rico, Republic of Ireland, the United Kingdom, Canada, and with increasing popularity in Australia and New Zealand. Halloween originated in Ireland as the pagan Celtic harvest festival, Samhain. Irish, Scots and other immigrants brought older versions of the tradition to North America in the 19th century. Most other Western countries have embraced Halloween as a part of American pop culture in the late 20th century. - Wikipedia
HALLOWEEN RECIPES
HALLOWEEN WITCHES BREW
Thaw and dilute with the following. 1 can (6 oz.) frozen grape juice
3 cans water
2 tbsp. honey
2 tbsp. lemon juice
1/4 tsp. ground ginger
1 cinnamon stick
2 whole cloves
In a sauce pan heat all ingredients over low heat until hot. Mix well. Let stand 5 minutes. Does not have to cool to serve. Remove cinnamon and cloves. Vary by adding 1/2 cup orange juice.
----------
HALLOWEEN MIX
10 c. popcorn
Peanut butter chips or Reese's Pieces
1 c. candy corn
M&M's, plain & peanut
Mix together. Serve.
----------
HALLOWEEN CUP CAKES
Preheat oven to 350 degrees. Beat together 1 (8 ounce) package cream cheese, 1 egg, 1/3 cup sugar, and 1/8 teaspoon salt. Add 1 (6 ounce) package chocolate chips. Add 12 drops of yellow food coloring and 8 drops of red. Blend well; set aside. sift 1 1/2 cups flour, 1 cup sugar, 1/4 cup cocoa, 1 teaspoon baking soda, and 1/2 teaspoon salt. Stir in 1 cup water, 1/3 cup oil, and 1 teaspoon vanilla. Fill 15 cupcake liners 1/3 full with chocolate batter; drop 1 heaping teaspoon of cream cheese mix on top. Bake 30 minutes.
----------
HALLOWEEN BARS
1/2 c. margarine or butter
1 1/2 c. graham cracker crumbs
1 (14 oz.) can sweetened condensed milk
1 (12 oz.) pkg. milk chocolate chips
1 c. peanut butter chips
Preheat oven to 350 degrees (325 degrees for glass dish). In 13 x 9 inch baking pan, melt margarine in oven. Sprinkle crumbs evenly over margarine; pour sweetened condensed milk evenly over crumbs. Top with chips; press down firmly. Bake 25 to 30 minutes or until lightly browned. Cool. Cut into bars.
----------
HALLOWEEN PUMPKIN COOKIES
1 stick butter or margarine
1/2 c. sugar
1 egg
1/2 c. cooked pumpkin or pie filling
1/2 tsp. vanilla
1 c. all-purpose flour
1/2 tsp. baking soda
1/4 tsp. salt
1/2 tsp. cinnamon
Preheat oven to 375 degrees. Cream the butter and sugar together in bowl. Add egg, pumpkin and vanilla. Sift dry ingredients together and add to bowl. Mix. Drop by tablespoon onto greased cookie sheet. Bake for about 15 minutes or until lightly browned.
----------
ROCKY ROAD HALLOWEEN SQUARES
12 oz. chocolate chips
14 oz. sweetened condensed milk
2 tbsp. margarine
2 c. dry roasted peanuts
1 pkg. miniature marshmallows
In top of double boiler or in microwave, melt chips, condensed milk, and butter. In large bowl, combine nuts and marshmallows. Fold in chocolate mixture. Spread in lined wax paper 13 x 9 inch pan. Chill 2 hours. Remove from pan, peel of wax paper. Cut into squares and store room temperature.
----------
HALLOWEEN BLACK CAT COOKIES
1 c. crunchy peanut butter
1/3 c. water
2 eggs
1 pkg. chocolate cake mix
M & M's (plain)
Red hots
Beat together peanut butter, eggs, and water. Gradually add cake mix. Mix well. Form dough into 1-inch balls. Place on ungreased cookie sheet. Flatten balls with bottom of glass dipped in sugar. Pinch out 2 ears at top of cookie. Add M & M's (eyes) and red hots (nose). Press fork into dough to form whiskers. Bake at 375 degrees for 8-10 minutes. Makes 4 1/2 dozen.
----------
HOOT OWL COOKIES FOR HALLOWEEN
3/4 c. butter or margarine
1 c. brown sugar
1 egg
1 1/2 tsp. vanilla
2 1/4 c. unsifted flour
2 tsp. baking powder
1/2 tsp. salt
1/3 c. cocoa
1/4 tsp. baking soda
1 tbsp. water
DECORATIONS:
1/4 c. butterscotch or peanut butter
chips
1/2 c. whole cashews
Cream butter, brown sugar, egg, vanilla in large bowl. Combine flour, baking powder and salt. Add to creamed mixture and blend well. Remove 2/3 of dough. To remaining 1/3 of dough add cocoa and baking soda that have been mixed. Then blend water into this mixture. Divide the plain dough into 2 parts. Roll each 1/2 into a 10x4 inch rectangle. Divide chocolate dough into 2 parts. Shape each 1/2 into a 10 inch roll. Roll each vanilla rectangle around a chocolate dough roll (jelly roll with chocolate in center). Wrap and freeze. To bake slice rolls and place 2 slices together, side by side with edges touching, on a greased cookie sheet. Pinch outside corners for ears. Place one chip in center of each chocolate circle for eyes. Put a cashew, curved side down, in the center where circles meet. This is the beak. Bake at 350 degrees 8-10 minutes. Cool and use spatula to remove from cookie sheet.
----------
HALLOWEEN SNACK MIX
1/2 c. blood drops (red hots)
1/2 c. cats eyes (blanched almonds)
or (gum drops)
1/2 c. cats claws (sunflower seeds)
1 c. chicken toenails (candy corn)
1 c. colored flies (M & M's)
1 c. butterfly wings (corn chips)
1 c. ants (raisins)
1 c. earthworms (cheese curls)
1 c. cobwebs (Triscuits) or (Golden
Grahams)
1 c. snakes eyes (peanuts)
1 c. bats bones (shoestring potatoes)
Mix together in a large bowl. Serve with several pints of blood (cherry punch).
----------
ORANGE DELIGHT (HALLOWEEN)
1 pkg. orange gelatin
1 c. hot water
1 c. shredded carrots
1 c. crushed pineapple
1 c. grated cheese
Mix gelatin and water, add remaining ingredients. Pour into 8x4 inch pan; chill for at least 2 hours. Cut into squares; serve. Yield: 6-8 servings.
----------
EASY HALLOWEEN HAYSTACKS
1 1/2 qts. popped popcorn
1 c. chow mein noodles
1 (12 oz.) pkg. butterscotch peanut
butter pieces
Combine popped popcorn and chow mein noodles in large bowl. In medium saucepan, melt butterscotch or peanut butter pieces over low heat, stirring occasionally until smooth. Pour melted candy over popcorn; stir to coat well. Drop by heaping tablespoons onto wax paper lined pan. Refrigerate until firm. Store in tightly covered container. Makes about 24.
----------
HALLOWEEN APPLES ON STICK
12 sm. red eating apples
12 wooden skewers
3 c. sugar
3/4 c. light corn syrup
1 c. water
Few drops oil of cloves
Red food coloring or 12 red cinnamon
candies
Wash apples in hot water and dry. Insert skewer in blossom end of each apple. In saucepan mix sugar, corn syrup and water. Cook over direct heat, stirring until sugar dissolves. Add oil of cloves a little coloring. Continue cooking without stirring until small amount cracks when dropped into cold water. Set pan over boiling water. Dip each apple into syrup. Remove and whirl apple until syrup covers it smoothly. Stand apple skewers side up on tray or plate to cool and harden.
----------
HALLOWEEN POPCORN TREATS
1/2 c. candy corn
Vegetable cooking spray
4 c. miniature marshmallows
8 c. air popped corn
Lightly coat 6 quart Dutch oven, spray a 13 x 19 baking pan with vegetable spray. Slice each piece of candy corn in half lengthwise. In Dutch oven over very low heat, melt marshmallows, stirring constantly. Remove from heat. Add popcorn, stirring to coat evenly; stir in candy corn. Using wax paper, press mixture evenly into pan, let cool about 1 hour. Cut into 24 squares. Each square 55 calories, negligible fat, 0 mg. cholesterol, 15 mg. sodium.
----------
HALLOWEEN GRAPE-NUTS CHOCOLATE DROPS
2 pkg. semi-sweet chocolate chips
1 (14 or 15 oz.) can sweetened
condensed milk
1 c. Grape-Nuts
1 tsp. vanilla
Melt chocolate over boiling water. Remove from heat. Stir until smooth; add milk. Blend. Add Grape-Nuts and vanilla. Drop from teaspoons onto waxed paper. Cool until firm. Yield: 5 dozen candies.
----------
HALLOWEEN JACK - O - LANTERN FROSTIES
4-6 navel oranges
1 (8 oz.) container vanilla or plain
yogurt
Icing tubes - several colors
Decorations*
Serrated knife
Grapefruit spoon
Blender
Straws
*Marshmallows, silver decors, colored candies, gumdrops, green-colored cherries, or pineapple Cut a thin slice of peel from the bottom of each orange so it will not roll. Slice off the top 1/3 of each orange. Scoop out the inside with the knife and grapefruit spoon. Put the pulp and juice (minus seeds) into the blender. Add container of yogurt and blend well. Decorate orange like a Jack-O-Lantern. Cut a hole in the "cap" and insert a straw. Pour drink from blender into Jack-O-Lantern cups and serve
----------
HALLOWEEN ROASTED PUMPKIN SEEDS
1 lg. pumpkin
1 1/2 tbsp. olive oil
1 1/2 tsp. salt
After carving your family's scary masterpiece don't discard the seeds! Instead, clean them of strands and mix with oil and salt. Plop onto a cookie sheet and bake in a 250 degree oven for about an hour. Stir occasionally.
----------
HALLOWEEN PUNCH
1 lg. can Hi-C orange drink
1 lg. can pineapple juice
1 lg. bottle ginger ale or 7-Up
1/2 gallon orange sherbet
Mix Hi-C, pineapple juice, and ginger ale. Spoon in orange sherbet.
----------
HALLOWEEN HONEY PUFFS
3/4 c. honey
3/4 c. sugar
2 tbsp. butter
4 tbsp. cocoa
11 c. puffed rice or wheat
3/4 c. coconut
Place honey, sugar, butter and cocoa in saucepan and boil to soft ball stage. Remove from heat. Mix puffed wheat and coconut. Pour syrup over, when cool enough to handle, form into balls and roll in coconut. Wrap in foil.
----------
HALLOWEEN SLUSH
1 pkg. lime gelatin
1 c. sugar
7-Up or gingerale
4 c. boiling water
3 c. pineapple juice
Mix all ingredients together except 7-Up. Place in container and freeze 4 to 5 hours. Remove from freezer when mixture is slushy. Fill glasses 1/2 full of slush. Fill remainder of glass with 7-Up. This can also be used in punch bowl. Place all slush in (12 inch) serving bowl and add 2 quarts 7-Up or gingerale.
----------
HALLOWEEN 'MULLED CIDER
1/2 c. brown sugar
1/4 tsp. salt
2 qt. cider
1 tsp. whole allspice
1 tsp. whole cloves
1 (3 inch) stick cinnamon
Combine first 3 ingredients in 3-quart saucepan. Tie spices in cloth bag; add to cider mixture. Bring to a boil; simmer for 20 minutes. Remove spice bag; serve hot.
----------
HALLOWEEN COCOA
1 (1 lb.) box instant cocoa mix
1 (8 qt.) box powdered milk
1 (6 oz.) jar powdered cream
1/2 c. (heaping) powdered sugar
Combine all ingredients. Store in airtight container. Place 1/3 cup mix in cup; fill with hot water to serve.
----------
HALLOWEEN SPIDERS
1 (12 oz.) pkg. chocolate chips
1 med. can of chow mein noodles (may not need all of them)
1 pkg. M & M candy
Melt chocolate in microwave. Stir in noodles. Drop by spoonfuls onto waxed paper. Add 2 M & M's for spider eyes. NOTE: Add 2 to 4 tablespoons water, if needed, to thin chocolate.
----------
HALLOWEEN FACE PAINT
1 tsp. cornstarch
1/2 tsp. water
1/2 tsp. cold cream
2 drops food coloring
In a small mixing bowl, combine all ingredients, mix well.
----------
GREASE PAINT FOR HALLOWEEN
2 tsp. white shortening
5 tsp. cornstarch
1 tsp. white flour
2 or 3 drops glycerin
Food coloring or cocoa for brown
Mix in given order.
----------
Halloween Treats for Dieters or Diabetics
from the Kitchen of Donna Hull
Ghoul's Breath Dip
1 pound (450 g) firm-ripe tomatoes, cored, seeded, and cut into 1/2-inch (1.25 cm) diced
1/4 cup (59 ml) finely chopped red onion
1 serrano chile pepper, seeded and minced
1 garlic clove, minced
3 tablespoons (45 ml) minced fresh cilantro
3 tablespoons (45 ml) fresh lemon juice
1/8 teaspoon (0.625 ml) hot pepper sauce, or to taste
1 cup (236 ml) fat-free sour cream In a medium bowl, combine all ingredients except sour cream.
Cover and refrigerate for at least 1 hour. Fold in sour cream and let stand for at least 30 minutes before serving with Raw Vegetables. Per 1/4-cup serving: 24 calories (4% calories from fat), 1 g protein, trace total fat (0.0 g saturated fat), 5 g carbohydrate, trace dietary fiber, 0 cholesterol, 14 mg sodium
Exchanges: 1 vegetable
----------
Halloween Treats for Dieters or Diabetics
from the Kitchen of Donna Hull
Halloween Gorp
3 tablespoons (45 ml) reduced-fat margarine, melted
1/2 teaspoon (2.5 ml) chili powder
1/2 teaspoon (2.5 ml) ground cumin
1/2 teaspoon (2.5 ml) garlic powder
1 teaspoon (5 ml) hot pepper sauce
2 qts (2 l) hot popped corn (popped with a hot-air popper)
1 cup (45 g) fat-free tiny pretzel sticks
1 cup (145 g) golden raisins
1/2 cup (73 g) dry roasted peanuts
1/2 cup (60 g) dry roasted sunflower seeds
In a small skillet, combine melted margarine, chili powder, cumin, garlic powder, and hot sauce. Heat for 1 minute over medium-high heat, stirring constantly. Place remaining ingredients in a large paper bag. Pour on margarine- spice mixture. Close bag tightly and shake vigorously to coat evening. Pour popcorn mixture into a large bowl.
Per 1-cup serving: 195 calories (42% calories from fat), 5 g protein, 8 g total fat (1.0 g saturated fat), 22 g carbohydrate, 3 g dietary fiber, 0 mg cholesterol, 69 mg sodium
Exchanges: 1 1/2 carbs (1 1/2 bread/starch), 2 fat
----------
Halloween Treats for Dieters or Diabetics
from the Kitchen of Donna Hull
Hot Spiced Witches Brew
1 cup (208 g) dried sugar-free orange-flavored break fast drink mix
1/2 cup (12 g) sugar-free iced tea mix
1/4 cup (52 g) sugar-free lemonade-flavored drink mix
1/2 teaspoon (2.5 ml) ground cinnamon
1 tablespoon (15 ml) whole cloves
1 continuous spiral peel of 1 orange
1 continuous spiral peel of 1 lemon
2 gallons (7.5 l) water 2-inch(5 cm) cinnamon sticks for swizzles
In a large pot, slowly bring all ingredients except cinnamon sticks to a boil. Stir and reduce heat to a low simmer. Serve hot in cups with cinnamon stick swizzles. Per 1-cup (236 ml) serving: 19 calories, 0 protein, 0 total fat (0 saturated fat), 4 carbohydrate, 0 dietary fiber, 0 cholesterol, 0 sodium
Exchanges: free
----------
Halloween Treats for Dieters or Diabetics
from the Kitchen of Donna Hull
Ghost Meringues 3 large egg whites, at room temperature
1/2 teaspoon (2.5 ml) cream of tartar
3/4 cup (188 g) one-to-one sugar substitute
1/2 teaspoon (2.5 ml) pure vanilla extract
24 dried currants Preheat oven to 200°F (130°C).
Line two large, heavy baking sheets with parchment paper. Combine egg whites and cream of tartar in a clean, grease-free mixing bowl and beat with an electric mixer until soft peaks form. Gradually add sugar substitute, 1 tablespoon (15 ml) every 30 seconds until meringue holds very stiff peaks. Beat in vanilla. Spoon meringue into a pastry bag fitted with a 1/2-inch (1.25 cm) plain tip or spoon into a gallon-size (1 l-size) heavy plastic food bag, then cut off 1 corner to make a 1/2-inch (1.25 cm) wide opening. Pipe meringue onto prepared baking sheets into ghost shapes, about 3 inches (3.75 cm) wide and 5 inches (6.25 cm) high. Space ghosts about 2 inches (2.5 cm) apart. Press 2 currants into each ghost to form the eyes.
Bake until meringues begin to turn pale gold and are firm to the touch, about 1 1/4 to 1 1/2 hours, switching baking sheet positions half way through the baking time. Turn off oven and leave meringues in closed oven for 2 hours. Cool slightly. When just barely warm, slip each ghost into a plastic sandwich bag and tie tops with pieces of orange and black ribbons
Per ghost: 23 calories (0% calories from fat), 1 g protein, 0 total fat (0 saturated fat), 8 g carbohydrates, 0 dietary fiber, 0 cholesterol, 14 mg sodium Diabetic exchanges: 1/2 carbohydrate (bread/starch) ©1997, 1998, 1999, 2000 Diabetic-Lifestyle Online Magazine. All rights reserved.
----------
Halloween Treats for Dieters or Diabetics
from the Kitchen of Donna Hull
Clown Party Dip
1 cup (236 ml) low-fat (1%) cottage cheese
1/2 cup (118 ml) plain nonfat yogurt
6 radishes, finely chopped
2 small carrots, shredded
2 tablespoons (30 ml) chopped parsley
2 tablespoons (30 ml) chopped scallions (white part only)
2 tablespoons (30 ml) chopped pimento
1 teaspoon (5 ml) prepared horseradish vegetable salt substitute, to taste
1. Using a potato masher or fork, mash cottage cheese to break up curds. Blend in yogurt and remaining ingredients. Mix well.
2. Chill for 1 hour before serving with raw vegetables or fat-free chips.
Per 1/4 cup serving: 37 calories (9% calories from fat), 5 g protein, trace total fat (0.2 g saturated fat), 4 g carbohydrate, 1 g dietary fiber, 2 mg cholesterol, 134 mg sodium
----------
TOASTED PUMPKIN SEEDS
Pumpkin seeds (fresh)
2 tbsp. melted butter
Scoop out the seeds from a pumpkin. Wash the seeds. Put on paper towel to dry. Grease cookie sheet with 2 tablespoons melted butter. Spread seeds on cookie sheet. Sprinkle with salt. Bake in 300 degree oven for 1 hour or until seeds are golden brown.
----------
PUMPKIN CUSTARD
1 c. evaporated skimmed milk
2 c. canned pumpkin puree
2 lg. eggs, lightly beaten with 2 tbsp. water
2 tbsp. firmly packed light brown sugar
2 tsp. vanilla extract
1/2 tsp. ground cinnamon
1/4 tsp. ground nutmeg
1/4 c. whipped topping
Ground cinnamon to garnish (optional)
Place milk in a 1 quart measure or casserole. Microwave on High 2 minutes, or until boiling. Stir in remaining ingredients except whipped topping and garnish. Spray eight 6 ounce custard cups with nonstick cooking spray. Pour custard evenly into cups. Place cups in circle on round tray. Microwave on Medium 20 minutes, rearranging cups every 4 minutes. Custard is cooked when knife inserted 1 inch from edge comes out clean and center is thickened, but not set. Refrigerate at least 1 hour, or until completely cooled and center is set. To serve, top each custard with 1 1/2 tsp. whipped topping. Sprinkle with cinnamon, if using. Makes 8 servings.
(Each serving provides: 1/4 P; 1/2 V; 1/4 M, 20 C. Per serving: 87 cal, 5 g pro, 2 g fat, 13 g car, 58 mg sod, 55 mg chol.)
----------
PUMPKIN PIE
3 eggs, slightly beaten
2 c. pumpkin
1/2 c. Sugar
1/2 c. brown sugar
1/2 c. corn syrup
1 tsp. vanilla
1 1/2 tsp. cinnamon
1/2 tsp. nutmeg
1/2 tsp. ginger
1/2 tsp. ground cloves
With mixer or blender, mix above ingredients. Pour into prepared pie crusts and bake at 350 for approximately 40 minutes. Makes two pies.
----------
PUMPKIN CUSTARD
1 c. evaporated skimmed milk
2 c. canned pumpkin puree
2 lg. eggs, lightly beaten with 2 tbsp. water
2 tbsp. firmly packed light brown sugar
2 tsp. vanilla extract
1/2 tsp. ground cinnamon
1/4 tsp. ground nutmeg
1/4 c. whipped topping
Ground cinnamon to garnish (optional)
Place milk in a 1 quart measure or casserole. Microwave on High 2 minutes, or until boiling. Stir in remaining ingredients except whipped topping and garnish. Spray eight 6 ounce custard cups with nonstick cooking spray. Pour custard evenly into cups. Place cups in circle on round tray. Microwave on Medium 20 minutes, rearranging cups every 4 minutes. Custard is cooked when knife inserted 1 inch from edge comes out clean and center is thickened, but not set. Refrigerate at least 1 hour, or until completely cooled and center is set. To serve, top each custard with 1 1/2 tsp. whipped topping. Sprinkle with cinnamon, if using. Makes 8 servings.
(Each serving provides: 1/4 P; 1/2 V; 1/4 M, 20 C. Per serving: 87 cal, 5 g pro, 2 g fat, 13 g car, 58 mg sod, 55 mg chol.)
----------
SOUR CREAM PUMPKIN COFFEE CAKE
1/2 c. butter
3/4 c. sugar
1 tsp. vanilla
3 eggs
2 c. flour
1 tsp. baking powder
1 tsp. baking soda
1 c. sour cream
1 (16 oz.) can pumpkin
1 slightly beaten egg
1/3 c. sugar
1 tsp. pumpkin pie spice
Cream together butter, sugar and vanilla. Add 3 eggs, beating well. Combine flour, baking powder and baking soda, add to butter mixture alternately with sour cream. Combine pumpkin, slightly beaten egg, sugar and pumpkin pie spice. Spoon half of batter into 13"x9"x2" baking dish, spread to corners. Sprinkle half of streusel over batter. Spread pumpkin mixture over streusel. Carefully spread remaining batter over pumpkin mixture. Sprinkle remaining streusel over top. Bake at 325 degrees for 50 to 60 minutes or until toothpick inserted in center comes out clean.
STREUSEL: Cut 1 cup packed brown sugar, 1/3 cup butter, 2 teaspoons cinnamon until blended. Stir in 1 cup chopped nuts.
----------
PUMPKIN CRUMB CAKE
1 box yellow cake mix
1/2 c. melted butter or margarine
1 egg
FILLING:
1 can pumpkin (29 oz.)
2 eggs
2/3 c. evaporated milk
1/2 c. brown sugar
2 tsp. cinnamon
TOPPING:
1 c. reserved cake mix
1/2 c. sugar
1/4 c. margarine or butter
1 tsp. cinnamon
Measure 1 cup of cake mix; set aside for topping. Combine the remaining cake mix, melted margarine and egg. Press mixture into greased 9 x 13 inch cake pan (press hard). Combine the above and pour over cake mixture in pan. Combine all ingredients for crumb topping. Sprinkle over filling. Bake 45-50 minutes at 350 degrees. Serve with Cool Whip.
----------
PUMPKIN TEA RING
1 tbsp. active dry yeast
1/4 c. lukewarm water (105-110 degrees)
1 c. milk
1/4 c. vegetable oil
2 tbsp. sugar
1/2 tsp. salt
5-5 1/2 c. whole wheat flour
1 (16 oz.) can pumpkin
1 tsp. ground cinnamon
1/2 tsp. ground nutmeg
1/4 tsp. ground cloves
1/2 c. currants or dark raisins
2 tbsp. margarine
2 tbsp. honey
Soften the yeast in the water. Combine the milk, oil, sugar and salt in a large bowl with 2 cups of the flour. Add the yeast mixture, pumpkin, cinnamon, nutmeg, loves and currants (or dark raisins). Mix well. Stir in 3 more cups of flour. Beat. Transfer to an oiled bowl, cover with a damp towel, and let rise in a warm place until doubled in bulk, about 1 hour. Punch down the dough and turn onto a lightly floured surface and knead in the remaining flour to make a smooth and elastic dough, about 5 minutes. Melt the margarine and honey together in a saucepan. Break off 2 inch pieces of dough and shape into balls. Dip them into the honey mixture.
Place in an oiled 10 inch tube pan. Cover and let rise in a warm place until doubled, about 1 hour. Bake in a 350 degree oven for 50-60 minutes. Let cool for 10 minutes before removing from the pan. Serve warm. Serves 25.
----------
SOUR CREAM PUMPKIN CHEESECAKE
1/2 c. butter
3/4 c. sugar
1 tsp. vanilla
3 eggs
2 c. flour
1 tsp. baking powder
1 tsp. baking soda
1 c. sour cream
1 3/4 c. (16 oz.) can solid pack pumpkin
1 slightly beaten egg
1/3 c. sugar
1 tsp. pumpkin pie spice
Streusel
Cream butter, 3/4 cup sugar, and vanilla in mixer bowl. Add 3 eggs, beating well. Combine flour, baking powder and baking soda. Add dry ingredients to butter mixture alternately with sour cream. Combine pumpkin, beaten egg, 1/3 cup sugar, and pie spice. Spoon half of batter into 13 x 9 x 2 inch baking dish; spread to corners. Sprinkle half of streusel over batter. Spread pumpkin mixture over streusel. Carefully spread remaining batter over pumpkin mixture. Sprinkle remaining streusel over top. Bake in slow oven (325 degrees) for 50 to 60 minutes or until toothpick inserted in center comes out clean.
Makes 12 servings.
----------
PUMPKIN PANCAKES WITH HOT CIDER SYRUP
2 c. flour
2 tbsp. sugar
4 tsp. baking powder
3/4 tsp. salt
1/2 tsp. coriander, ground
1 tsp. cinnamon
1/2 tsp. nutmeg
1 1/2 c. milk
1 c. canned pumpkin, mashed
4 egg yolks
4 oz. melted butter
1 tbsp. vanilla
4 egg whites, stiffly beaten
HOT CIDER SYRUP:
1 1/2 c. apple cider
1 c. brown sugar
1 c. corn syrup
2 oz. butter
2 tbsp. lemon juice
1/8 tsp. cinnamon
1/8 tsp. nutmeg
Grated rind from 1 lemon
2 apples, peeled, cored & thinly sliced
In a large bowl, sift together flour, sugar, baking powder, salt, coriander, cinnamon and nutmeg. In a separate bowl, combine milk, pumpkin, egg yolks, butter and vanilla. Pour combined liquid ingredients into dry ingredients and stir until just blended. Carefully fold in egg whites. Cook pancakes on a light oiled griddle. In a small saucepan, combine apple cider, brown sugar, corn syrup, butter, lemon juice, cinnamon, nutmeg and lemon rind. Bring to a boil. Reduce heat and simmer uncovered for 15 minutes. Add apples. Heat for several minutes more. Serve over pancakes.
Serves 6.
----------
PUMPKIN SWIRL CHEESECAKE
2 c. vanilla wafer crumbs
1/4 c. Parkay margarine, melted
2 (8 oz.) pkgs. light Philadelphia Brand Neufchatel (cream) cheese, softened
3/4 c. sugar
1 tsp. vanilla
3 eggs
1 c. canned pumpkin
3/4 tsp. cinnamon
1/4 tsp. ground nutmeg
Combine crumbs and margarine; press onto bottom and sides of 9" springform pan. Combine cream cheese, 1/2 cup sugar and vanilla, mixing at medium speed on electric mixer until well blended. Add eggs, one at a time, mixing well after each addition. Reserve 1 cup cream cheese mixture; add pumpkin, remaining sugar and spices to remaining cream cheese mixture. Mix well. Layer half of pumpkin mixture and half cream cheese mixture over crust; repeat layers. Cut through batter with knife several times for marble effect. Bake at 350 degrees for 55 minutes. Loosen cake from rim of pan; cool before removing rim of pan. Chill. 10 to 12 servings.
----------
PUMPKIN BREAD
4 eggs
3 c. sugar
2/3 c. oil
1/3 c. water
1 can one-pie pumpkin
3 1/2 c. flour
2 tsp. baking soda
1 1/2 tsp. salt
1 tsp. cinnamon
1 tsp. nutmeg
Beat eggs and sugar. Add oil, water and pumpkin. Add flour, baking soda, salt and spices. Bake approximately 1 hour at 350 degrees. Makes 2 loaves.
----------
PUMPKIN MUFFINS
1 c. sugar
1/4 c. light vegetable oil
2 eggs
3/4 c. canned pumpkin
1 1/2 c. all-purpose flour
1 tsp. baking powder
1/2 tsp. baking soda
1/4 tsp. ground cloves
1/4 tsp. cinnamon
1/4 tsp. nutmeg
1/2 tsp. salt
3/4 c. raisins
1/2 c. chopped walnuts
Heat oven to 400 degrees. Generously grease a 12-cup muffin tin. Mix sugar, oil, eggs and pumpkin. Sift together flour, baking powder, baking soda and spices. Quickly stir together both mixtures. Fold in raisins and walnuts. Fill prepared muffin cups 2/3 full and bake 18 to 20 minutes. until golden brown. To test for doneness, use a sharp knife or broom straw. When the knife or straw comes out clean, muffins are done. Remove from oven and let them cool a few moments in the pan before removing. Serve warm with butter or honey butter.
----------
PUMPKIN OAT MUFFINS
1 1/3 c. oat bran
1 c. rolled oats
1 1/4 c. skim milk
3/4 c. whole wheat flour
1/2 c. brown sugar
1 tbsp. baking powder
2 tsp. cinnamon
1/2 tsp. ginger
3/4 c. canned pumpkin
2 egg whites or 1/4 egg substitute
2 tbsp. vegetable oil
1/2 c. raisins
1/2 tsp. nutmeg
Preheat oven to 400 degrees. Combine oat bran and milk in bowl. In separate bowl mix flour, baking powder, spices and brown sugar. In third bowl, blend pumpkin, egg whites, oil and raisins then add the mixture to the oat mixture. Add the flour mixture. Stir until moist. Do not over mix. Spray 12 muffin pans with pan spray, pour in the batter. Bake 20 to 25 minutes or until lightly brown.
----------
PUMPKIN - BANANA BREAD
1 1/2 c. granulated sugar
1/2 c. shortening
2 eggs
1 c. mashed, well ripened bananas
3/4 c. solid pack pumpkin
1 tsp. vanilla extract
1 3/4 c. all-purpose flour
2 tsp. baking powder
1 tsp. baking soda
1/2 tsp. salt
1/2 c. chopped walnuts or pecans
In large mixer bowl, cream sugar and shortening. Beat in eggs, bananas, pumpkin and vanilla; mix well. In medium bowl, combine flour, baking powder, baking soda, salt and nuts. Add dry ingredients to pumpkin mixture; mix well. Spoon batter into greased and floured 3 x 5 inch loaf pan. Top with walnuts or pecans if desired. Bake in preheated 350 degree oven for 55-65 minutes. Can also check for clean toothpick inserted in center. Cool for 10 minutes. Remove from pan and cool on wire rack. Makes 1 loaf.
----------
PUMPKIN PECAN BREAD
3 1/2 c. self-rising flour
1 1/2 tsp. cinnamon
1 tsp. nutmeg
3 c. sugar
2 c. canned pumpkin
1 c. oil
4 eggs
2/3 c. water
1 c. chopped nuts
Preheat oven to 350 degrees. Oil and flour three 8x4 inch loaf pans. Sift together flour, cinnamon and nutmeg. Add sugar and mix well. Add oil, eggs, water and pumpkin all at once. Mix well, then add nuts. Pour into pans, filling each half full. Bake for 30 minutes or until toothpick stuck in middle comes out clean.
----------
PUMPKIN STREUSEL MUFFINS
1 egg, beaten
1/2 c. milk
1/2 c. canned pumpkin
1/3 c. oil
1 3/4 c. flour
1/2 c. sugar
3 tsp. baking powder
1 tsp. cinnamon
1/2 tsp. salt
1/2 tsp. nutmeg
3 oz. cream cheese
TOPPING:
1/4 c. packed brown sugar
1/2 tsp. cinnamon
1 tbsp. butter or margarine
1/4 c. finely chopped nuts
Preheat oven to 400 degrees. Combine egg, milk, pumpkin and oil. Stir in remaining ingredients except cream cheese until dry ingredients are moistened. Batter will be lumpy. Fill greased tins about 1/2 full. Divide cream cheese into 12 equal portions. Place cream cheese in center of batter and top with remaining batter to 3/4 full. Combine topping ingredients and mix well. Sprinkle over each muffin. Bake 15 to 20 minutes or until golden brown. Serve hot. Makes 12 muffins.
----------
INDIAN PUMPKIN BREAD
2/3 c. butter or shortening
4 c. brown sugar
1 c. crushed pumpkin, cooked
4 eggs
3 1/2 c. flour
1 c. apple juice
1/2 tsp. nutmeg
1 c. nuts, chopped (walnuts or pecans)
1 1/2 tsp. cinnamon
1/2 tsp. baking powder
2 tbsp. baking soda
1 c. applesauce
Cream butter and sugar together, then add the eggs, one at a time, beating all together real well. Stir in applesauce and pumpkin. Now sift the dry ingredients together and add with the apple juice. Now stir in nuts and pour into 2 greased bread loaf pans. Bake for 1 hour in a 350 degree oven.
----------
COFFEE CAN PUMPKIN BREAD
4 eggs
2 (16 oz.) cans pumpkin
2/3 c. cold water
1/2 tsp. baking powder
2 tsp. baking soda
1 1/2 tsp.salt
3 c. sugar
2 1/2 c.flour
1 c. salad oil
1 tsp. nutmeg
1 tsp.cinnamon
1 tsp. cloves
Beat eggs,add sugar, beat well. Add pumpkin, water, oil and beat. Add dry ingredients which have been sifted together. Fill 1 pound coffee can 3/4 full. Bake at 325 degrees for 1 1/2 hours or until top springs to touch. Can be frozen IN CAN.
----------
PUMPKIN APPLE STREUSEL MUFFINS
2-1/2 c. flour
2 c. sugar
1 tbsp. pumpkin pie spice
1 tsp. baking soda
1/2 tsp. salt
2 eggs, slightly beaten
1 c. canned pumpkin
1/2 c. vegetable oil
2 c. peeled, finely chopped apples
STREUSEL TOPPING:
2 tbsp. flour
1/2 c. sugar
1/2 tsp. ground cinnamon
4 tsp. butter
In large bowl, combine first five ingredients. In medium bowl, combine eggs, pumpkin and oil. Add liquid ingredients to dry ingredients. Stir until just moistened. Stir in apples. Spoon batter into greased or paper lined muffins cups, filling 3/4 full. Sprinkle Streusel Topping Over batter. Bake in preheated 350 degree oven for 35 to 40 minutes or until toothpick comes out clean. STREUSEL TOPPING: In small bowl combine flour, sugar and 1/2 teaspoon cinnamon. Cut in 4 teaspoons butter, until mixture is crumbly.
----------
BLACK FOREST PUMPKIN BREAD
1 c. vegetable oil
3 c. sugar
4 eggs
1 1/2 tsp. salt
1 tsp. ground cloves
1 tsp. ground nutmeg
1 tsp. ground cinnamon
2/3 c. hot water
2 tsp. baking soda
2 c. pureed pumpkin or squash
3 1/2 c. all-purpose flour
1 c. chopped pecans (opt.)
1/2 c. grated fresh ginger root (opt.)
Heat oven to 350 degrees. In a large bowl combine oil and sugar. Add eggs, 1 at a time, beating well after each addition. Beat in salt, cloves, nutmeg and cinnamon. Blend 2/3 cup hot water into baking soda; stir into batter. Add pumpkin or squash and flour. Fold in optional nuts and ginger root. Bake in 3 greased and floured 1 pound coffee cans for 1 hour or until tests done. NOTE: Great with cream cheese. Makes 3 loaves.
----------
PUMPKIN SPICE CAKE
1/2 c. shortening
1 1/3 c. sugar
2 eggs
1 c. canned or fresh pumpkin
2/3 c. buttermilk
1 3/4 c. sifted all-purpose flour
2 tsp. baking powder
1 tsp. salt
2 tsp. cinnamon
1/2 tsp. nutmeg
1/4 tsp. allspice
1/4 tsp. ginger
Cream the shortening and sugar until fluffy. Add eggs, one at a time, beating well. Combine pumpkin and milk. Sift dry ingredients and spices; add to creamed mixture alternately with pumpkin, beating well. Bake at 350 degrees for 40 to 45 minutes in a greased and floured oblong baking pan.
Frost with: 1/2 cup butter (softened), 1 egg yolk, 2 teaspoons vanilla, and 3 cups sifted confectioners' sugar. Blend and beat at medium speed for 3 minutes before spreading on cooled cake.
----------
PUMPKIN BARS OR CAKE
4 eggs
15 oz. can pumpkin OR 1 1/2 to 2 c. fresh, cooked, blended pumpkin
2 c. sugar
1 c. salad oil
2 c. flour
2 tsp. baking powder
1 tsp. soda
1/2 tsp. salt
2 tsp. cinnamon
1/2 tsp. cloves
1/2 tsp. nutmeg
1/2 tsp. ginger
----------
CREAM CHEESE FROSTING:
1 (6 oz.) pkg. cream cheese
3/4 stick margarine or butter
4 c. powdered sugar
1 tbsp. milk
1 tsp. vanilla
Mix the following ingredients in large bowl: Sift the following and stir into the above: Mix well and pour into greased and floured 9 x 13 pan for cake, 12 x 18 pan for bars. Bake at 350 degrees for 25 to 35 minutes.
----------
PUMPKIN COOKIES
1/2 c. butter or margarine
1-1/2 c. brown sugar, packed
2 eggs
1 c. cooked, mashed pumpkin (can or fresh)
1 tsp. vanilla
2 1/2 c. all-purpose flour
3 tsp. baking powder
1 tsp. salt
1 tsp. cinnamon
1/2 tsp. allspice
1/4 tsp. ginger
1 c. chopped walnuts (optional)
----------
PUMPKIN GLAZE:
1 1/4 c. unsifted powdered sugar
2 tbsp. butter, softened
1 tsp. cinnamon
1/4 tsp. allspice
Dash of nutmeg
2-3 tbsp. mashed pumpkin
Cream butter and sugar. Beat in eggs and pumpkin until light and fluffy. Stir in vanilla. Mix all dry ingredients together in a bowl. Stir into creamed mixture to make a rather soft cookie dough. Stir in nuts. Spoon onto greased cookie sheets about 2 inches apart in rounded teaspoonfuls. Bake at 375 degrees for 12 to 15 minutes. Remove while hot. Cool slightly. Then glaze with Pumpkin Glaze. Stir all ingredients together, except pumpkin. Then blend in pumpkin until smooth.
SOURCE: Alicia's Recipes
Tags:
Food Products
Read more
Posted on 1:16 AM | 0 Comments | Email Story To Friends | Subscribe Via Email
Fruitcake Recipes
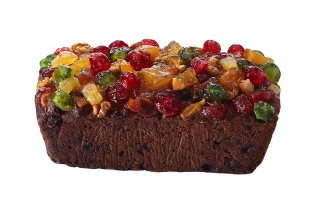 Christmas is less than a hundred days away and today is the best time to learn how to do fruitcakes! Below are two ways to make Christmas Fruitcakes. Christmas is less than a hundred days away and today is the best time to learn how to do fruitcakes! Below are two ways to make Christmas Fruitcakes.
Boozy Fruitcake
Steps:
1. Heat oven to 300 degrees F.
2. Line three 8-by-4-by-2-inch loaf pans with buttered parchment paper.
3. Place the candied fruit, candied citrus peel, fresh citrus peel and raisins in a bowl.
4. Pour in 1/2 c. of the rum and set aside, stirring occasionally. The rum will soon be completely absorbed.
5. Sift together the flour, salt, cinnamon, nutmeg and baking powder, and reserve.
6. Place the butter in the bowl of an electric mixer and beat until very fluffy, about 5 minutes. Add the light brown sugar and beat another 2 minutes.
7. Add the eggs one at a time, then add the flour, and mix only until incorporated.
8. Fold in the fruit and walnuts by hand and divide the batter between the pans.
9. Bake for 1 hour, then top each cake with aluminum foil to prevent overbrowning.
10. Bake for 30 to 40 minutes more. See tips for doneness tests.
11. Cool completely.
12. While cakes cool, cut cheesecloth into three 2-foot lengths and soak in remaining rum.
13. Wrap each cake in one section of the cheesecloth, then wrap in plastic wrap.
14. Refrigerate at least one week, but preferably three.
Tips:
There are two ways to test for doneness: Insert a toothpick into the center of a cake; if it comes out clean, it's done. Or, press the top of the cake with your fingers; if it feels firm and spongy and springs back when pressed, it's done.
Either rum or brandy can be used as the alcohol in this recipe, depending on your personal preference.
You can also use regular dried fruit (dates, apricots, peaches, pears, cranberries and so on) instead of the candied fruit, if you prefer.
Cake flour produces a more tender crumb than all-purpose flour. It can be found in the baking section of your supermarket.
Fruitcake Truffles
Ingredients:
6 (1 ounce) squares semisweet chocolate
3 tablespoons whipping cream
3 tablespoons butter
2 tablespoons orange liqueur
1 cup fruitcake crumbs
1/2 cup sifted confectioners' sugar
Method :
1. Chop chocolate into small pieces. In saucepan over very low heat, melt chocolate, cream, and butter until blended and smooth.
2. Stir in liqueur and fruitcake crumbs; chill for 2 hours or until firm.
3. Shape into 1 inch balls and chill at least 20 minutes. Before serving, roll in icing sugar or coca powder and chill for 20 minutes.
SOURCE: eHOW
Tags:
Food Products
Read more
Posted on 12:09 AM | 0 Comments | Email Story To Friends | Subscribe Via Email
Sunday, September 17, 2006
How to Make a Simple Christmas Parol
 The most popular symbol of Christmas in the Philippines is the parol. It represents the blessed star of Bethlehem. For Filipinos, not having a parol for decoration makes Christmas somewhat incomplete. The parol's size depende on where it will be hung. A very large parol is usually used for high-rise buildings. For regular houses, parols are smaller. The most popular symbol of Christmas in the Philippines is the parol. It represents the blessed star of Bethlehem. For Filipinos, not having a parol for decoration makes Christmas somewhat incomplete. The parol's size depende on where it will be hung. A very large parol is usually used for high-rise buildings. For regular houses, parols are smaller.
What you will need:
1. Two 32-inch (80 cm) bamboo strips
2. A ruler
3. Five 3-inch (7.5 cm) wire strips
4. Ten 7-inch (17.5 cm) wire strips
5. Tape
6. Thread
7. Glue
8. A pencil
9. Scissors
10. Tinsel
11. Colorful paper 24" x 24" (60 x 60 cm). You can use thin Japanese papers or shiny gift wrappers as substitute.
Directions:
1. Use thread to tie the ends of each bamboo strip together, forming two circles.
2. Use the two circles and five of the 7-inch (17.5 cm) wire strips to make a frame by twisting the ends of each wire strip around the bamboo circles as shown.

3. Fold the colorful paper in half. Draw the shape of a five-pointed star and cut it out. You will have two stars.

4. Glue one star to each side of the circular frame. Attach the other five 7-inch (17.5 cm) wires to the five points where the angles of the star touch the wire frame. Attach the five 3-inch (7.5 cm) wires to the tips of the star so the star bulges. Tie some thread to one of these wires. Glue on pieces of paper to cover the frame. Attach tinsel to the two bottom points of the star.

End Product:

SOURCE: Festivals of the World: Philippines, Gareth Stevens Publishing. Milwaukee: 1999, pp. 28-29.
Tags:
Small & Medium Business
Read more
Posted on 11:56 PM | 0 Comments | Email Story To Friends | Subscribe Via Email
How To Make Homemade Gifts: Personalized T-Shirts
Homemade gifts are personal and unique. They can also be good for your bank account. Make them when you’re broke, or when you just want to expand your creativity. Any time's a good time for gifts.
Personalized T-Shirts:
Digitalized
1. All you need is some iron-on paper, plain colored T-shirts, and a printer (that supports the use of iron-ons).
2. Print out funny words, pictures, or designs from your computer on the iron-on paper.
3. Place the T-shirt on a flat ironing board, and carefully iron over the image so it adheres to the shirt. Image should appear exactly the same way it was placed.
4. Once you peel of the transparent layer, let the shirt cool. It’s an instant gift! Some ideas for wordy T-shirts are: “I’m with Stupid (with an arrow pointing to the left/right),” “Ugly but adorable,” and “I love...” Be creative.
Old Fashioned
1. As for the old fashioned way, you will need some plain colored T-shirts, fabric paint, and rubber stamps. With this, you are slightly limited in terms of creativity because every image you create will be a replica of the stamp.
2. Prepare paint in bowls, and lay the T-shirt on a flat surface.
3. Dip the stamps into the paint and carefully stamp the bottom lining of the T-shirt (or anywhere else you prefer; the tip here is to stamp pictures in such a way that it is aesthetically pleasing. Unlike tie-dye, prints have to appear in areas where they can be seen, and understood). E.g. a large flower print can appear right in the middle or the bottom right/left of the T-shirt.
SOURCE:
How To Make Homemade Gifts: Personalized T-Shirts
By Danielle Chong
Monday, December 19, 2005
howtodothings.com
Tags:
Small & Medium Business
Read more
Posted on 11:46 PM | 4 Comments | Email Story To Friends | Subscribe Via Email
How To Start a Home Based Business
 Starting a home based business is a dream for many people. Some want a release from the daily grind of home-to-work-to-home, others the freedom of being “their own boss”, and still others want the ability to make their own hours or have a flexible schedule. Whatever your reason, there are several things to consider when starting your own home based business. Starting a home based business is a dream for many people. Some want a release from the daily grind of home-to-work-to-home, others the freedom of being “their own boss”, and still others want the ability to make their own hours or have a flexible schedule. Whatever your reason, there are several things to consider when starting your own home based business.
1. What are you qualified to do that you can do from home? For example, if you are a CPA, you can easily work from your home by setting up a small office with a computer, fax/copier, and phone line. If you are a machinist, you could work from home, but would need to set up a shop, purchase equipment, and possibly get permits or licenses.
2. If you have skills in a field that would require a large capital outlay and serious infrastructure, you can still start a home based business -- but will it be worth it? Or what if you don't have skills that translate to the home? There are other opportunities for working from home that you may not currently be qualified for, but can acquire training in, and begin with relatively low start-up costs and a relatively short learning curve. Businesses such as product consultants, sales, network marketing or light assembly fit this description. Just be sure to thoroughly investigate all costs, product quality, training systems, fees and licenses associated with such businesses.
3. Once you have decided on the type of business you think you can run from your home, you next must investigate the market. Before jumping in with both feet, you should learn whether there is a need or demand for your product or service, and if so, how much competition is out there.
Are there dozens of people in your town doing the same thing? Or if your business is online, how many pages of similar businesses show up on a Google search? Also consider what it is that you offer that the competition doesn’t. Is your product or service of a higher quality? Do you deliver results more quickly? Do you offer more personalized attention? Don’t be afraid of competition; just be aware of it so you can market yourself better.
4. Consider licensing. Do you need a license, and how do you get one if you do? Whether you need a license or not depends upon the type of business you are starting. Most consulting-type businesses do not require licensing, but there are some typical businesses that do. Usually, doctors, lawyers, contractors, and barbers (even if you barber from home) are required to be licensed. Check with the appropriate local government agencies to be sure. Don't start your new business off on the wrong foot.
5. If you decide to operate your business as a sole proprietorship, but choose to use a name other than your own, you may be required to file a DBA, which means "Doing Business As", with your local County Clerk's office. Again, check with that office to be certain.
6. It is possible that your home based business idea might require more capital than you have available. If you are not able or willing to enlist the help of a financial backer, you might consider obtaining a small business loan.
7. You now have a business you are qualified to run, or you’ve obtained training in a new business. You have researched the market and know your worth to your customers and how you outshine the competition. Now what?
Arguably the most important aspect of running your own business is setting goals, and then working your plan. It is easy when working from home to get distracted or procrastinate because there is no boss looking over your shoulder. Make a schedule, and stick to it. You have to be the toughest boss you’ve ever had. It’s all up to you, and only you. If you don’t work this business at least as hard as you worked at your job, you will almost certainly fail.
Yes, you have the freedom of flexibility, but you need to discipline yourself or the business will slip away. Eighty-five percent of all small businesses fail within the first five years. Discipline yourself to be in the fifteen percent that succeed.
8. Look into finding a mentor. A mentor is someone with experience in your business who can help and guide you. Their experience is invaluable, and can help you avoid some of the stumbling blocks and pitfalls that you might have fallen into otherwise. The best way to find a mentor is to network. Meet people, and make a friends.
Start by searching your community for business organizations designed for networking. Most communities have them. You can also join your local Rotary, Toastmasters, or take a Dale Carnegie course. You might be surprised at how often people are willing to share what they have learned.
9. Lastly, consider running your home based business while continuing to work at your job. This provides a safety net as you build up your business. When the business seems large enough and stable enough that you can leave your job, then do so. Until that time, even though it will be tiring, do both. Additionally, as most of the tax laws in the US are geared toward business owners and not employees, a side benefit of your new business is that the legal tax deductions will help you to keep more of your job paycheck. Only take legal deductions.
While there are challenges with starting a home based business, it can be one of the most rewarding things you will do. If you feel you have what it takes, go for it!
SOURCE:
How To Start a Home Based Business
By Donald Willard
Wednesday, May 10, 2006
http://www.howtodothings.com
Tags:
Entrepreneur Essentials
Read more
Posted on 11:30 PM | 0 Comments | Email Story To Friends | Subscribe Via Email
Thursday, September 14, 2006
Herbal Medicines Part 1
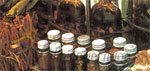 Herbalism, also known as Herbal medicine and phytotherapy, is folk and traditional medicinal practice based on the use of plants and plant extracts. Finding healing powers in plants is an ancient idea. People in all continents have long used hundreds, if not thousands, of indigenous plants for treatment of various ailments dating back to prehistory. There is evidence that Neanderthals living 60,000 years ago in present-day Iraq used plants for medicinal purposes (found at a burial site at Shanidar Cave, Iraq, in which a Neanderthal man was uncovered in 1960. He had been buried with eight species of plants). These plants are still widely used in ethnomedicine around the world. Herbalism, also known as Herbal medicine and phytotherapy, is folk and traditional medicinal practice based on the use of plants and plant extracts. Finding healing powers in plants is an ancient idea. People in all continents have long used hundreds, if not thousands, of indigenous plants for treatment of various ailments dating back to prehistory. There is evidence that Neanderthals living 60,000 years ago in present-day Iraq used plants for medicinal purposes (found at a burial site at Shanidar Cave, Iraq, in which a Neanderthal man was uncovered in 1960. He had been buried with eight species of plants). These plants are still widely used in ethnomedicine around the world.
A survey released in May 2004 by the National Center for Complementary and Alternative Medicine focused on who used complementary and alternative medicines (CAM), what was used, and why it was used. The survey was limited to adults age 18 years and over during 2002 living in the United States. According to this recent survey, herbal therapy, or use of natural products other than vitamins and minerals, was the most commonly used CAM therapy (18.9%) when all use of prayer was excluded.
Herbal remedies are common in Europe and the Philippines.
SAMPALOC
For Colds
1. Boil the chopped leaves in 2 glasses of water for 15 minutes, or until the water is reduced to half its volume. Allow to cool and strain.
2. Divide the decoction into 3 parts and drink 1 part every after each meal.
The following measurements should guide you:
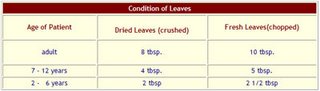
For wounds and itchiness:
1. Boil one to two handfuls of the chopped plant material in a pot of water for 15 minutes.
2. Let cool and strain.
3. Use the decoction twice a day for washing the wound or itchy portion.
YERBA BUENA (MARSH MINT, PEPPER MINT)
The Yerba Buena plant is a creeping herb that rises to only 20 cm. (or 8 in.) from the ground. Its stems are fleshy or non-woody, and the leaves are coarse. This plant is also strongly aromatic. There is another creeping plant that is also called Yerba Buena. Known scientifically as Mentha arvensis L. and also commonly known as Poleo or Poliyo in some places, this non-medicinal Yerba Buena has narrower leaves and bears lilac flowers, while the medicinal Yerba Buena does not flower in the Philippines. Yerba Buena is indicated or used primarily as pain reliever. The medical term for pain reliever is analgesic. As analgesic, it is effective for headaches, toothache, and pains caused by arthritis. But Yerba Buena has other medicinal uses too, called its secondary indications. It is also used for gaseous distention and as mouthwash. Yerba Buena is best propagated using terminal stem cuttings. Cut the top end of mature stems consisting of three to four parts of leaves, maintaining a length of 10 to 15 cms. (4 to 6 in.), and plant them in containers or directly in plots. They will grow roots in a weeks time. The cuttings, if planted in containers, may be transplanted to plots two weeks after planting. It may also be planted near or between tall plants as it can tolerate partial shading. But avoid using chemical pesticides because they might leave poison on the plants. The procedure for using Yerba Buena as pain reliever or analgesic is the same whether its for headache, toothache, or arthritis. Preparing the decoction: The amount of leaves you should use differs depending on whether the leaves are dried or fresh and on how old the patient is. Fresh leaves are washed first and then chopped coarsely, while air-dried leaves are crushed.

After you have identified how much leaves to use, boil the leaves in 2 glasses of water for at least 15 minutes. This boiled mixture is called "decoction." Divide the decoction into two parts and take one part every three hours. These are important rules to follow when boiling the leaves in water.
Observe strictly the following:
a. Use only enameled container or claypot (palayok), never an aluminum pot.
b. A standard glass or cup should contain 240 ml. or 8 fluid ounces of water. This measurement is the same as the content of a bottle of regular Pepsi or Coke.
c. Mix leaves in water before placing on fire.
d. As soon as the mixture boils, uncover the pot and let boil continuously for 15 minutes. Remember that the mixture should boil uncovered.
e. Strain and let cool. You now have what is called a decoction.
f. For headache, toothache, or arthritis take one-half (1/2) glass (standard glass or cup) of decoction every three hours, as needed.
When applied as fresh leaves: If the pain caused by headache, toothache, or arthritis is moderate and localized you may choose to just apply fresh Yerba Buena leaves on the affected part. Fresh leaves are heated, then pounded and applied on affected part.
When used as mouthwash: Aside from being medicinal, Yerba Buena is also a mouthwash. It is prepared as follows: Soak tablespoonfuls of chopped fresh leaves in a glass of water for 30 minutes. Strain and use as mouthwash.
Harvesting and Storing Leaves:It is best to harvest only the mature and healthy leaves. Make sure, though, that the plant is left with enough leaves to survive. If you wish, you may harvest excess leaves and air-dry them for storing. Air-drying takes place about four days on warm weather or about two weeks during the rainy season. Leaves are sufficiently dry if they crumble when crushed with the fingers. Dried leaves should be sealed in plastic bag or kept in covered tinted glass jar. Keep leaves in a cool, dry place and away from direct sunlight to extend their storage life.
LAGUNDI
Luzon: Dabtan, Dangla, Kamalaan, Limo-limo, Lingei, Lingo-lingo
Visayas: Lagundin, Tugas
Mindanao: Kalipapa-madam, Limpapa, Magupay, Molrei-oso, Sugarai
Lagundi is a shrub that grows to as tall as 5 meters. A shrub is described as somewhere between an herb and a tree. A shrub is a low, woody plant with several stems while a tree is a tall, woody plant with only one stem called "trunk." A leaf of Lagundi is composed of 5 leaflets arranged like fingers in a hand. Lagundi is indicated or used primarily for the following:
1. To stop coughing, relieve asthma, and facilitate the discharge of phlegm.
2. To lower fever due too colds or flu.
Preparing the Lagundi Mixture (Decoction)
For cough, asthma, and fever, the steps in preparing Lagundi leaves as medication are the same.
Measurements: However, the amount of leaves you should use differs depending on whether the leaves are dried or fresh and on how old the patient is. Fresh leaves are washed first and then chopped coarse, while air-dried leaves are crushed. The following measurements should guide you:
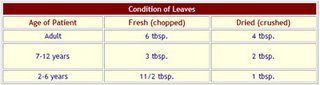
After you have identified how much leaves to use, boil the leaves in 2 glasses of water for at least 15 minutes. This boiled mixture is called "decoction."
Boiling the Mixture: There are important rules to follow when boiling the leaves in water. Observe strictly the following:
1. Use only enamelled container or claypot ("palayok"), never an aluminum pot.
2. A standard glass or cup should contain 240 ml. or 8 fluid ounces of water. This measurement is the same as the content of a bottle of regular size Pepsi or Coke.
3. Mix leaves in water before placing on fire.
4. As soon as the mixture boils, uncover the pot and let boil continuously for 15 minutes. Remember that the mixture should boil uncovered.
5. Strain and let cool. You now have what is called a "decoction."
Storing the Decoction: For convenience, you may prepare enough decoction that you can use for several days. Simply adjust the amount of leaves to use according to the amount of water you will boil. While kept in thermo pot ("termos") the decoction will last for three days without losing its efficacy. When kept in refrigerator the decoction will last up to four days without losing its efficacy. Keep in mind, however, that whether kept in thermo pot or refrigerated, the decoction must not be taken anymore when its color has changed or when it has grown molds or fungus.
Primary Medicinal Uses of Lagundi, Dosage and Ailments: The amount of decoction to drink and how often depends on a persons ailment, as described. The dosage is the same for children and adults.
Cough: For cough, take one-half (1/2) glass of decoction three times a day (preferably at 6:00 a.m., 2:00 p.m., and 10:00 p.m.; or any other 8-hours interval most convenient to your schedules.) Also, drink at least 8 glasses of water a day to further help loosen phlegm. If you cough does not improve in three days, consult a physician. You should also consult a physician when you observe any of the following:
1. When your coughing and breathing become difficult.
2. When your phlegm smells bad, or has blood, or is yellowish or greenish in color.
3. When the hoarseness of your voice persists for more than two weeks.
Asthma: For asthma, take one-third (1/3) glass of decoction three times a day (preferably at 6:00 a.m., 2:00 p.m. and 10:00 p.m.; or any other 8-hours interval most convenient to your schedules). If your asthma does not improve after one dose of the decoction or when the attack is severe, consult a physician.
When treating asthma, remember that it is sometimes an allergic reaction to certain materials or food items, or even environmental conditions. It may also be caused by fatigue and worrying. In these cases, it is wisest for you to identify those that trigger the asthma attack so you can avoid or protect yourself against them.
Fever Due To Flu or Colds For fever take one-half (1/2) glass of decoction every three hours, as needed.
Headache: To relieve headache, heat enough fresh leaves over a ire until slightly wilted. Then crush the leaves and apply on forehead and temples. Bandage the leaves in place. Change the dressing every four hours when needed. If you have headache, it is best for you to rest in a quiet, cool, and dimly-lighted room. A cold pack or massage on the forehead and nape also soothes the pain. If the headache accompanies fever or colds, appropriate therapy for the fever or colds must be taken concurrently. In case the headache is not relieved after one day of treatment, it is a must that you see a physician.
Toothache: For toothache, take one-half (1/2) glass of decoction every three hours. You are advised though to see your dentist whether the toothache is relieved or not.
As Wound Wash: As wash for wounds and other minor skin irritations, boil 2 handfuls of fresh leaves in enough water. Strain the boiled mixture and let cool. Use this to wash the wound or affected part once in the morning and once before bedtime. Then cover the wound with gauze or thin cloth, if needed, as protection from dirt and flies. When washing wound, remove pus and dead tissues that have formed. See a physician if the wound does not improve within one week, or when the wound has caused fever, when you lymph nodes have become swollen and painful, or when too much pus has formed.
As Bath: As bath for mother who just gave birth and for sick people, boil 4 handfuls or more of fresh. Lagundi leaves in sufficient amount of water for five minutes. Strain and add plain water to bring it to a comfortable warmness.
How To Plant Lagundi: Lagundi is easily propagated using cuttings. It is best to use a mature leafless stem (hardwood) as cutting. A stem to be cut must be 20 cms. (8 inches) long and should include at least 3 nodes. The nodes are where the new leaves will grow. To plant the cutting, insert the lower one-third (1/3) of the stem cutting (with one node included) into the soil. Then water the soil thoroughly after planting. Keep the new plant under shade. In about 4 weeks, the new plant must have grown its own roots. In two more weeks, the cutting is ready to be transplanted to a bigger pot or garden.
Caring for the Plant: You will have to water the plant every day. Remove weeds and apply fertilizer or compost if you want. You must remove branches and leaves attacked by pests or diseases so they do not spread to the whole plant. Avoid using chemical pesticides because they might leave poison in the plant itself. Remember that you planted Lagundi for its medical uses, and that you intend to take boiled mixture of Lagundi leaves later on.
Harvesting and Storing Leaves: It is best to harvest only the mature and healthy leaves. Make sure, though, that the plant is left with enough leaves to survive. The first harvest of leaves is best done seven to eight months after transplanting and as a way of pruning the grown plant. Leaves can be harvested every four months thereafter for air-drying or storing. Or if you have only a few potted plants, you may choose to harvest leaves only as you need them. Air-drying takes about for days on warm weather or about two weeks during the rainy season. Leaves are sufficiently dry if they crumble when crushed with the fingers. Dried leaves should be sealed in plastic bag or kept in covered tinted glass jar. Keep leaves in cool, dry place and away from direct sunlight to extend their storage life.
TSAANG GUBAT
Luzon: Kalabong, Kalimumog, Katdalugod, Maragued, Mara-mara, Taglokot, Talibunog,
Tst, Tsaang-gubat, Tsa-tsa
Visayas: Alibungog, Semente
Mindanao: Alangitngit, Alingitngit, Buyo-buyo
Tsaang-gubat is a low, woody plant with several stems. It is grown as ornamental or bonsai because of its attractive appearance. Its leaves are small and have dark, green and shiny upper surface. Tsaang-gubat is indicated or used primarily for diarrhea. But it is also advised for stomachache and colic.
Diarrhea: A person has diarrhea or LBM (Loose Bowel Movement) when his stool is soft to watery and when he has to move his bowels more often than two times in one day. To treat diarrhea using Tsaang-gubat, follow these steps:
1. Determine the amount of Tsaang-gubat leaves to use. The amount of leaves to use varies according to the age of patient and the condition of leaves, as follows:
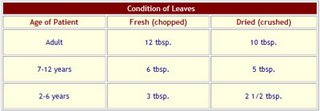
2. Boil correct amount of leaves in 2 glasses of water for 15 minutes.
3. Let cool, then strain and divide into 4 parts.
4. Take 1 part every two hours (until stool becomes solid).
Boiling the Mixture: There are important rules to follow when boiling the leaves in water. Observe strictly the following:
a. Use only enameled container or claypot ("palayok"), never an aluminum pot.
b. A standard glass or cup should contain 240 ml. or 8 fluid ounces of water. This measurement is the same as the content of a bottle or regular size Pepsi or Coke.
c. Mix leaves in water before placing on fire.
d. As soon as the mixture boils uncover the pot and let boil continuously for 15 minutes. Remember that the mixture should boil uncovered.
e. Strain and let cool. You now have what is called "decoction."
Storing the Decoction: For convenience, you may prepare enough decoction that you can use for several days. Simply adjust the amount of leaves to use according to the amount of water that you will boil. When kept in thermo pot ("termos"), the decoction will last for three days without losing its efficacy. When kept in refrigerator, the decoction will last up to four days without losing its efficacy. Keep in mind, however, that whether kept in thermo pot or refrigerated the decoction must not be taken anymore when its color has changed or when it has grown molds or fungus.
Oral Rehydration Solution
To prevent dehydration due to diarrhea, a person should take a solution of water, sugar and salt, known as Oral Rehydration Solution or ORS. ORS can either be bought from the drugstore, obtained for your community health clinic or prepared at home. To prepare your own ORS, simply mix in a pitcher or jar 4 glasses of water, 2 tablespoons of sugar, and 3/4 (three-fourths) teaspoon of salt. These are the basic ingredients of an ORS. An adult is advised to drink at least three glasses of this solution every one hour or after every diarrheal discharge. Children should take in one and one-half (11/2) glasses. But a "more complete" ORS can be prepared by substituting some of the basic ingredients. If honey is available, use 2 tablespoons honey instead of sugar. Also, the three-fourth (3/4) teaspoon salt can be substituted with one-fourth (1/4) teaspoon baking soda plus one-fourth (1/4) teaspoon salt. In severe dehydration, a diarrheal patient is rehydrated intravenously with a solution, more popularly called dextrose or saline. Only a medical personnel is allowed to administer this procedure.
Stomachache and Colic: To relieve stomachache and colic caused by indigestion, excessive air in the stomach or vomitting, Tsaang-gubat is prepared as follows:
1. Determine the amount of Tsaang-gubat leaves to use, which varies according to the age of patient and the condition of leaves, as follows:
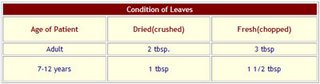
2. Boil correct amount of leaves in 1 glass of water for 15 minutes.
3. Strain and drink when lukewarm. If the pain is not relieved within one hour after taking Tsaang-gubat, prepare another glassful following the same steps above. If the pain is still not relieved, then see a physician. The cause of the stomachache may be something else.
How to Plant Tsaang-Gubat: Tsaang-gubat is propagated using either seeds or basal cuttings. Although using basal cuttings cannot assure that all cutting will survive, it is still preferred over the use of seeds. Its because seeds take very long to germinate, and germinated seeds need another long time to grow. For a basal cutting only the lower portion of a stem, which is also its harder part is used. For Tsaang-gubat, a basal cutting should be about 20 cm. (8 in.) long and must include at least three nodes. The nodes are where the new leaves will grow or come out. Plant basal cuttings by inserting the lower one-third (1/3) of the stem, at least one node into the soil, in separate containers or pots. Water immediately after and place under shade. The cuttings will root six to eight weeks from planting. They may be transplanted to plots or retained in larger pots. Avoid using chemical pesticides because they might leave poison on the plants. It is best to harvest only the mature and healthy leaves. If you wish, you may harvest excess leaves and air-dry them for storing. Air-drying takes about four days on warm weather or about two weeks during the rainy season. Leaves are sufficiently dry if they crumble when crushed with the fingers. Dried leaves should be sealed in plastic bag or kept in covered tinted glass jar. Keep leaves in a cool, dry place and away from direct sunlight to extend their storage life.
PAPAYA
One of the most common fruit trees, papaya can be found in tropical and sub-tropical countries and usually grows in lowlands. A typically small tree, it can grow from 3 to 6 meters high. Its fleshy fruit comes from the female flowers and can grow from 5 to 30 cm. big. It is yellow or yellowish-orange when mature, with black seeds embedded in the pulp. The parts used as fruits, leaves and latex of trunk and fruit.
For constipation: Get the ripe fruit of the tree. Eat the fruit liberally. Yellowing of the skin, especially the palms and soles may occur but this is harmless.
For foul wounds: Get the latex of the trunk of the fruit. Apply this to the wound and let it say for 15 minutes before washing it off. Do this once a day.
For rheumatism: From the bruised papaya leaves, prepare a heated mass (poultice). Apply the poultice in areas where rheumatism occurs.
To be continued...
SOURCE: Sorsogon LGU
Tags:
Small & Medium Business
Read more
Posted on 10:25 AM | 0 Comments | Email Story To Friends | Subscribe Via Email
|